PowerShell Script to EXE Conversion Guide
This article serves as a guide for converting PowerShell scripts to executable files (EXE) using various methods and tools.
- Download and install the Exe and Dll File Repair Tool.
- The software will scan your system to identify issues with exe and dll files.
- The tool will then fix the identified issues, ensuring your system runs smoothly.
Purpose of PowerShell Script to EXE
![]()
The purpose of converting a PowerShell script to an EXE file is to make it easier to run and distribute. By converting the script to an executable file, users can simply double-click on the file to run it, without the need for any additional software or command-line interface. This is especially helpful for less tech-savvy users who may not be familiar with PowerShell or how to run scripts.
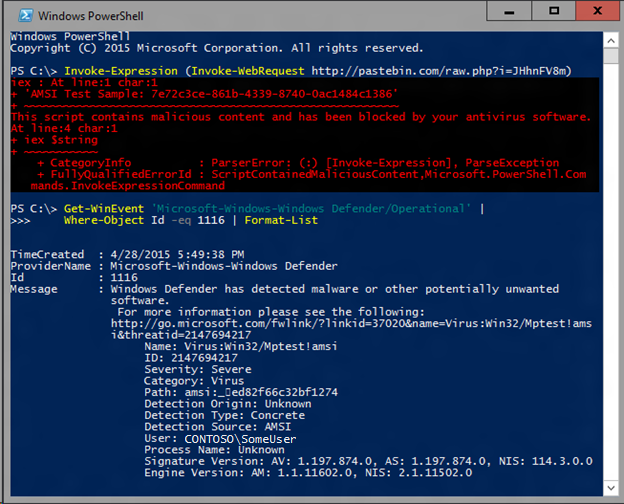
Converting the script to an EXE file also helps to mitigate any potential security concerns. Some users may be hesitant to run PowerShell scripts due to the possibility of running malicious code or inadvertently causing harm to their computer. By converting the script to an EXE file, it can be scanned by antivirus software and reduces the risk of false positives or false negatives.
Origin and Creator of PowerShell Script to EXE
PowerShell Script to EXE is a conversion process that transforms a PowerShell script into an executable (.exe) file. The origin and creator of this method can be traced back to the PowerShell community, where developers and users found the need for a more user-friendly way to distribute and run PowerShell scripts.
By converting a script to an .exe file, users can bypass the need for PowerShell to be installed on the target machine. It also eliminates the need for users to run scripts from the command-line interface, making it more accessible to non-technical users.
However, it is important to note that converting scripts to .exe files can have potential security implications. Some antivirus software may flag the .exe file as a potential threat, leading to false positives or false negatives. Users should exercise caution and ensure that the .exe file is obtained from a trusted source.
Legitimacy and Safety of PowerShell Script to EXE
![]()
When converting a PowerShell script to an .exe file, it is important to ensure its legitimacy and safety. Follow these steps to ensure a secure conversion process.
1. Verify the source: Before converting a PowerShell script to an .exe file, make sure that the script comes from a reliable source. Be cautious of scripts obtained from unfamiliar or untrusted websites.
2. Use reputable conversion tools: Choose a trusted and reputable conversion tool to convert the PowerShell script to an .exe file. Look for tools that have been vetted by the community and have positive reviews.
3. Scan for malware: Before running the conversion tool, scan both the PowerShell script and the conversion tool itself for malware using an up-to-date antivirus program. This step helps protect against potential threats.
4. Test in a controlled environment: After converting the script to an .exe file, test it in a controlled environment, such as a virtual machine, to ensure it functions as intended and does not have any unexpected behaviors.
5. Beware of false positives and false negatives: Some antivirus programs may flag legitimate .exe files as malware (false positives) or fail to detect actual malware (false negatives). Keep this in mind and be cautious when encountering such situations.
Usage and Benefits of PowerShell Script to EXE
![]()
PowerShell Script to EXE conversion offers several usage and benefits. It allows you to package your PowerShell scripts into a standalone executable file, making it easier to distribute and run on different machines without the need for PowerShell installation. This is especially useful when dealing with systems that have User Account Control (UAC) restrictions or when sharing scripts with non-technical users. By converting the script to an . exe file, you can also protect your code and prevent unauthorized modifications.
Furthermore, it enhances the usability by allowing you to customize the script’s icon, version information, and other properties. Converting PowerShell scripts to EXE also reduces the risk of false positives and false negatives from antivirus software, as some programs may flag scripts as potential threats. With PowerShell Script to EXE conversion, you can streamline your script deployment process and improve the user experience.
Associated Software and Compatibility with Windows Versions
![]()
| Associated Software | Windows 7 | Windows 8 | Windows 10 |
|---|---|---|---|
| PowerShell | Yes | Yes | Yes |
| PowerShell ISE | Yes | Yes | Yes |
| PowerShell Studio | No | No | Yes |
| Sapien PowerShell Vx.x | No | No | Yes |
Malware Concerns and Removal Tools for PowerShell Script to EXE
- Use reputable antivirus software to scan and remove any existing malware on your system.
- Ensure that your antivirus software is up to date with the latest virus definitions.
- Regularly scan and update your system to prevent malware infections.
Removal Tools for PowerShell Script to EXE
- Identify the specific malware or suspicious script that needs to be removed.
- Research and find reputable removal tools that are designed to target and remove the identified malware or script.
- Download the removal tool from a trusted source or the official website of the tool’s developer.
- Open the downloaded file and follow the installation instructions provided by the removal tool.
- Launch the removal tool and perform a full system scan to detect and remove the malware or script.
- Review the scan results and follow any prompts or recommendations provided by the removal tool.
- Once the removal process is complete, restart your computer to ensure that all changes are applied.
- Regularly update the removal tool to stay protected against new threats.
Troubleshooting Issues with PowerShell Script to EXE
-
Check for Errors in the PowerShell Script
- Open the PowerShell script in a text editor.
- Review the script for any syntax errors or missing commands.
- Ensure that all variables and functions are properly defined.
- Fix any errors found in the script.
-
Ensure Execution Policy Allows Script Execution
- Open PowerShell with administrative privileges.
- Type Get-ExecutionPolicy and press Enter to check the current execution policy.
- If the policy is set to Restricted, type Set-ExecutionPolicy followed by the desired policy (e.g., RemoteSigned) and press Enter to change it.
- Confirm the change by typing Y and pressing Enter.
-
Verify that Required Modules are Installed
- Open PowerShell with administrative privileges.
- Type Get-Module and press Enter to list all installed modules.
- Check if the required modules for the script are present in the list.
- If any modules are missing, install them by typing Install-Module followed by the module name and pressing Enter.
-
Check for File Path Issues
- Verify that the file path specified in the script is correct.
- Ensure that the script and any required files are located in the specified path.
- If necessary, adjust the file path in the script to match the actual location of the files.
-
Disable Antivirus or Firewall Interference
- If an antivirus or firewall program is blocking the execution of the script, temporarily disable it.
- Refer to the documentation of the antivirus or firewall program for instructions on how to disable it.
- Try running the script again to see if the issue is resolved.
-
Update PowerShell Version
- Check the current version of PowerShell by typing $PSVersionTable.PSVersion and pressing Enter.
- Compare the version with the latest available version on the official PowerShell website.
- If a newer version is available, download and install it.
- Restart the computer after the installation process is complete.
Performance Impact and High CPU Usage of PowerShell Script to EXE

When converting a PowerShell script to an .exe file, it’s important to be aware of the potential performance impact and high CPU usage that may occur. This is because the conversion process involves compiling the script into an executable file, which can consume more system resources compared to running the script directly.
To minimize performance issues, consider the following tips:
1. Optimize your script: Ensure your PowerShell script is efficient and well-optimized before converting it to an .exe file. This includes using proper coding practices, minimizing unnecessary loops or operations, and optimizing resource usage.
2. Consider user account control: If your script requires administrative privileges, be aware that the .exe file may trigger User Account Control (UAC) prompts when executed. Inform users about this potential behavior to avoid confusion.
3. Beware of computer viruses: Just like any other executable file, .exe files created from PowerShell scripts can potentially carry computer viruses. Make sure to scan the converted file with reliable antivirus software before distributing it.
By keeping these considerations in mind, you can ensure a smoother conversion process and mitigate any performance issues that may arise from running the PowerShell script as an .exe file.
Latest Update: July 2025
We strongly recommend using this tool to resolve issues with your exe and dll files. This software not only identifies and fixes common exe and dll file errors but also protects your system from potential file corruption, malware attacks, and hardware failures. It optimizes your device for peak performance and prevents future issues:
- Download and Install the Exe and Dll File Repair Tool (Compatible with Windows 11/10, 8, 7, XP, Vista).
- Click Start Scan to identify the issues with exe and dll files.
- Click Repair All to fix all identified issues.

Running PowerShell Script to EXE in the Background

When running a PowerShell script as an .exe file in the background, there are a few steps you need to follow. First, make sure you have the necessary permissions on your computer to run scripts. Open a command prompt by pressing Win + R and typing cmd. Navigate to the directory where your PowerShell script is located using the cd command. Once in the correct directory, use the powershell.exe -ExecutionPolicy Bypass -File scriptname.ps1 command to run the script in the background.
This will allow the script to run without any user interface or console window. It will also bypass any execution policies that may prevent the script from running.
Difficulty Deleting PowerShell Script to EXE and Safe to End Task
When it comes to converting a PowerShell script to an EXE file, you may encounter difficulty deleting the converted file. This can happen if the file is still running in the background or if it’s being used by another program. To delete the EXE file, you need to ensure that the process associated with it is stopped.
To do this, open the Task Manager by pressing Ctrl+Shift+Esc. In the Processes tab, locate the process related to the EXE file and end the task. Once the process is terminated, you should be able to delete the file without any issues.
It’s important to exercise caution when ending tasks in the Task Manager, as it may affect the functionality of other programs. Make sure you’re only ending the task associated with the EXE file you want to delete.
Description and Process of PowerShell Script to EXE
This section will provide a concise description and process for converting a PowerShell script to an executable (.exe) file.
To convert a PowerShell script to an .exe, you can use a tool like PowerShell Pro Tools or PowerShell Studio. These tools provide a user-friendly interface that allows you to package your script into an executable file.
Once you have the tool installed, you can open your PowerShell script and configure any desired settings such as the output file name and icon.
Next, you can use the tool’s build or compile option to generate the .exe file.
After the conversion is complete, you can run the .exe file on any Windows machine without needing to have PowerShell installed.
Converting your PowerShell script to an .exe can provide a more user-friendly experience, as the end users won’t need to interact with a command-line interface. It also helps to protect your script from being modified or accessed by unauthorized users.
Not Responding and Removal Options for PowerShell Script to EXE
- PowerShell script not responding: If your PowerShell script is not responding, try checking for any infinite loops or heavy resource usage that might be causing the issue.
- Debugging your PowerShell script: Utilize PowerShell’s built-in debugging features, such as breakpoints and step-by-step execution, to identify and fix any issues in your script.
- Updating PowerShell version: Ensure that you have the latest version of PowerShell installed, as older versions may have compatibility issues with certain PowerShell script to EXE conversion tools.
- Using different conversion tools: If one PowerShell script to EXE conversion tool is not working as expected, consider trying alternative tools to see if they provide better results.
- Checking antivirus software: Some antivirus programs may flag PowerShell scripts or converted EXE files as potentially malicious. Verify that your antivirus software is not interfering with the conversion process.
- Removing PowerShell script to EXE: If you need to remove the converted EXE file, simply delete it like any other file on your system.
- Uninstalling conversion tools: If you no longer need a specific PowerShell script to EXE conversion tool, follow the uninstallation instructions provided by the software vendor to remove it from your system.
Startup and Update Procedures for PowerShell Script to EXE
To start and update a PowerShell script to EXE, follow these steps:
1. Open PowerShell and navigate to the directory where the script is located using the cd command.
2. Convert the script to an executable file by running the following command: ps2exe.ps1 -inputScript script.ps1 -outputExe script.exe. Replace “script.ps1” with the name of your script and “script.exe” with the desired name for the executable file.
3. Once the conversion is complete, you can run the EXE file by double-clicking on it or using the command line.
4. To update the script, make changes to the original script file and repeat step 2 to convert it to an updated EXE file.
Remember to always keep your PowerShell script and EXE file in a secure location to protect against computer viruses. This conversion process is specifically for Microsoft Windows users.
By converting your PowerShell script to an EXE file, you can enhance usability by allowing users to run the script without needing to install PowerShell or any scripting language. It also provides a more user-friendly experience as the script can be executed directly from the Start menu or context menu.
Note: Make sure to scan the EXE file for any potential threats before running it, especially if you obtained it from the World Wide Web or an unknown source.
Alternatives to PowerShell Script to EXE
If you’re looking for alternatives to converting PowerShell scripts to EXE, there are a few options you can consider. One option is to use a third-party software like PowerShell Studio or PowerShell Pro Tools, which have built-in features for converting scripts to executables. Another option is to use a different scripting language, such as Python or Batch scripting, which also have tools available for converting scripts to executables. Additionally, you can use a tool like PS2EXE which is a free and open-source tool specifically designed for converting PowerShell scripts to EXE files. It’s important to note that converting scripts to executables can have security implications, so make sure to only convert scripts from trusted sources and be cautious when executing EXE files.
Downloading and Updating PowerShell Script to EXE
To download and update a PowerShell script to EXE, follow these steps:
1. Visit the Microsoft website and search for “PowerShell script to EXE conversion tool.”
2. Choose a reputable tool from the search results and download it onto your computer.
3. Once the tool is downloaded, locate the PowerShell script you want to convert to an EXE file.
4. Right-click on the script file and select “Convert to EXE” from the context menu.
5. The conversion tool will open, allowing you to customize various parameters such as the output file name and icon.
6. After customizing the settings, click on the “Convert” or “Build” button to start the conversion process.
7. Once the conversion is complete, you will have an EXE file that can be run on any Windows computer without requiring PowerShell.
By converting the PowerShell script to an EXE file, you can enhance the user experience, protect the script from being easily modified, and ensure compatibility across different systems.
Impact on System Files and Performance
Converting a script to an EXE file can alter system files, particularly if the script interacts with system directories or files. This can impact the overall performance of the system and potentially cause issues with other applications or processes.
To minimize these risks, it’s important to thoroughly test the converted EXE file before deploying it. This includes checking for any unintended changes to system files and monitoring the performance of the system during and after execution.
Additionally, it’s crucial to ensure that the converted EXE file is obtained from a reliable source and does not contain any malicious code. Always download from trusted websites and use reputable antivirus software to scan the file before execution.
By taking these precautions, you can minimize the impact on system files and ensure optimal performance when converting a PowerShell script to an EXE file.
Evaluating the Legitimacy of PowerShell Script to EXE
When evaluating the legitimacy of a PowerShell script to EXE conversion, there are a few key factors to consider. First, ensure that the script comes from a reliable source, such as a trusted developer or a reputable website like Superuser. It’s important to be cautious of scripts downloaded from unknown or suspicious sources to avoid potential computer viruses or malware. Additionally, verify that the script is compatible with your version of Microsoft Windows and that it has been tested and reviewed by other users.
Before running the converted EXE file, take the time to review the script and its parameters to understand its functionality and ensure it aligns with your needs. Finally, always run a reputable antivirus program to scan the file for any potential threats.