Troubleshooting Windir Network Diagnostic Xpnetdiag Exe
This article provides troubleshooting tips for Windir Network Diagnostic Xpnetdiag.exe, a diagnostic tool used in the Windows XP operating system.
- Download and install the Exe and Dll File Repair Tool.
- The software will scan your system to identify issues with exe and dll files.
- The tool will then fix the identified issues, ensuring your system runs smoothly.
Purpose of windir network diagnostic xpnetdiag exe
The windir network diagnostic xpnetdiag.exe is a tool in the Windows operating system that helps troubleshoot network connectivity issues. It is primarily used in Windows XP and Windows Vista.
If you are experiencing problems with your network connection, you can use this tool to diagnose and fix the issue. To access it, open the Start menu and type “xpnetdiag” in the search box.
Once the tool is open, it will analyze your network settings and perform various tests to identify any problems. It can check for issues with your network adapter, DNS settings, firewall, and more.
If any problems are found, the tool will provide recommendations and instructions on how to resolve them.
It is important to note that the windir network diagnostic xpnetdiag.exe is not a substitute for antivirus software or other security measures. It is a troubleshooting tool that can help diagnose and fix network-related issues.
Origin and creator of windir network diagnostic xpnetdiag exe
![]()
The windir network diagnostic xpnetdiag.exe is a tool created by Microsoft for troubleshooting network-related issues on Windows Vista and later versions of the operating system.
This executable file is located in the System32 folder and is typically accessed through the Command Prompt or the Run dialog box. It is designed to diagnose and fix common network problems, such as connectivity issues or DNS resolution errors.
To use the windir network diagnostic xpnetdiag.exe, simply open the Command Prompt or Run dialog box and type “xpnetdiag“. This will launch the diagnostic tool and display a series of prompts and options for troubleshooting network problems.
It is important to note that the windir network diagnostic xpnetdiag.exe should only be used by experienced users or with guidance from a technical professional. It is also recommended to have a backup of important files and to run antivirus software before using any system diagnostic tool.
Usage and functions of windir network diagnostic xpnetdiag exe
The windir network diagnostic xpnetdiag.exe is a tool in Microsoft Windows that helps diagnose and troubleshoot network connectivity issues. It can be accessed through the Start menu or by typing “xpnetdiag” in the Run dialog (Win + R).
Once opened, the tool will run a series of tests to check your network configuration, DNS settings, IP address, and other network-related settings. It will then provide you with a detailed report of any issues found, along with suggested solutions.
To use windir network diagnostic xpnetdiag.exe effectively, follow these steps:
1. Open the tool using one of the methods mentioned above.
2. Wait for the diagnostic tests to complete.
3. Review the report for any errors or warnings.
4. If issues are found, follow the recommended solutions, which may include resetting network settings, checking firewall settings, or updating network drivers.
5. Test your network connectivity again to see if the issue is resolved.
Legitimacy and safety of windir network diagnostic xpnetdiag exe
The legitimacy and safety of the windir network diagnostic xpnetdiag exe file have been a concern for many users. To troubleshoot any issues related to this file, follow these steps:
1. Scan for malware: Use a reliable antivirus program to scan your computer for any malware or viruses that may be causing problems.
2. Check system files: Use the System File Checker tool to scan and repair any corrupted or missing system files that may be affecting the xpnetdiag exe file.
3. Perform a System Restore: If the issue started recently, try using the System Restore feature to revert your computer back to a previous working state.
4. Update Windows: Make sure your Windows operating system is up to date with the latest patches and updates. Use the Windows Update feature to check for and install any available updates.
5. Backup important files: Before making any changes or modifications, it’s always a good idea to backup your important files and data.
Associated software with windir network diagnostic xpnetdiag exe
- Check for Malware or Viruses:
- Open Task Manager by pressing Ctrl+Shift+Esc.
- Look for any suspicious processes running and terminate them.
- Run a full system scan using a reliable antivirus software.
- If any malware or viruses are detected, follow the recommended actions to remove them.
- Update or Reinstall Associated Software:
- Open the Control Panel by clicking on the Start button and selecting Control Panel.
- Navigate to Programs and Features (or Add or Remove Programs).
- Locate the software associated with windir network diagnostic xpnetdiag exe.
- Right-click on it and select Update or Uninstall.
- If updating, follow the on-screen instructions to complete the process.
- If uninstalling, restart your computer and then reinstall the software from a reliable source.
- Check for System File Corruption:
- Open Command Prompt by clicking on the Start button and typing cmd in the search bar.
- Right-click on Command Prompt and select Run as administrator.
- In the command prompt window, type sfc /scannow and press Enter.
- Wait for the system file checker to scan and repair any corrupted files.
- Once the process is complete, restart your computer.
- Perform a System Restore:
- Open the Control Panel by clicking on the Start button and selecting Control Panel.
- Navigate to System and Security.
- Click on System to open the system properties.
- Go to the System Protection tab.
- Click on System Restore.
- Follow the on-screen instructions to choose a restore point and start the system restore process.
- Wait for the restoration to complete and your computer to restart.
System file status of windir network diagnostic xpnetdiag exe
![]()
The windir network diagnostic xpnetdiag.exe is a system file in Microsoft Windows that is responsible for diagnosing network-related issues. If you are experiencing problems with your network connection, troubleshooting this file can help identify and resolve the issues.
To troubleshoot windir network diagnostic xpnetdiag.exe, follow these steps:
1. Open the Command Prompt by pressing the Windows key + R, then type “cmd” and press Enter.
2. In the Command Prompt, type “xpnetdiag.exe” and press Enter to run the diagnostic tool.
3. The tool will analyze your network connection and provide information about any issues it finds.
4. Pay attention to any error messages or warnings displayed during the diagnostic process.
5. If the tool detects any problems, it will attempt to fix them automatically. If not, it will provide guidance on how to resolve the issue manually.
6. Follow the recommended steps to fix the network problem and test your connection again.
By troubleshooting windir network diagnostic xpnetdiag.exe, you can efficiently resolve network issues and ensure a smooth and stable connection on your Windows computer.
Troubleshooting windir network diagnostic xpnetdiag exe
If you’re experiencing issues with windir network diagnostic xpnetdiag.exe, here are some troubleshooting steps to try.
1. Check for errors: Look for any error messages or pop-ups related to xpnetdiag.exe. These can provide valuable clues about the issue.
2. Restart your computer: Sometimes a simple restart can resolve software glitches or conflicts.
3. Update Windows: Make sure your operating system is up to date, as outdated software can cause problems. Use Windows Update to install any available updates.
4. Scan for malware: Run a thorough scan with your preferred antivirus software to check for any malicious programs that may be interfering with xpnetdiag.exe.
5. Reinstall the program: If the issue persists, try uninstalling xpnetdiag.exe and then reinstalling it. This can fix any corrupted files or settings.
High CPU usage and performance impact of windir network diagnostic xpnetdiag exe
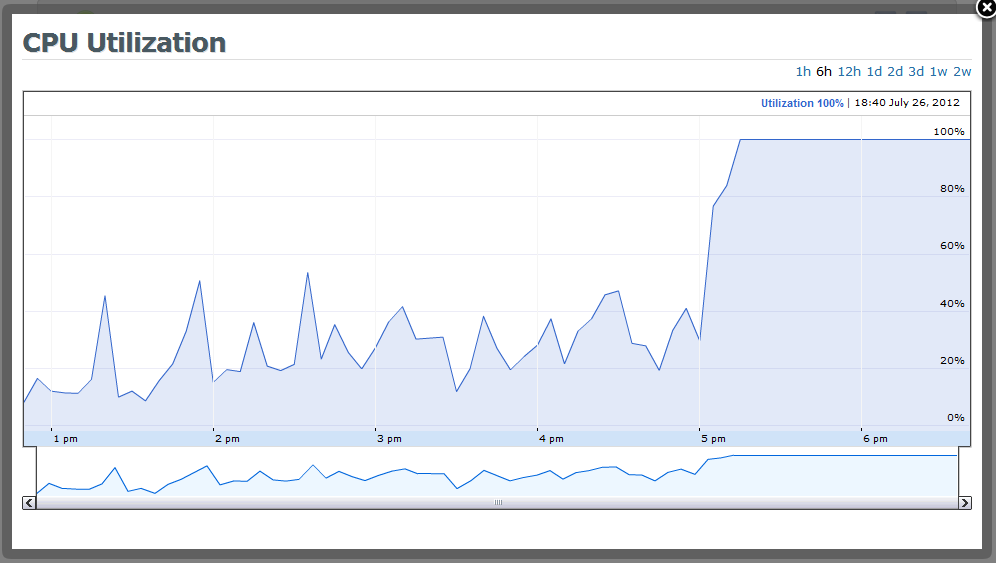
If you are experiencing high CPU usage and performance issues related to windir network diagnostic xpnetdiag.exe, there are a few troubleshooting steps you can take to address the problem.
First, check for any error messages related to xpnetdiag.exe. If you see any, try restarting your computer and see if the issue persists.
If the problem continues, you can try disabling xpnetdiag.exe from running at startup. To do this, open the Task Manager by pressing Ctrl+Shift+Esc and go to the Startup tab. Locate xpnetdiag.exe and disable it.
If disabling xpnetdiag.exe doesn’t resolve the issue, you can try updating your network drivers. Visit your computer manufacturer’s website or the website of the network card manufacturer to download and install the latest drivers.
Latest Update: July 2025
We strongly recommend using this tool to resolve issues with your exe and dll files. This software not only identifies and fixes common exe and dll file errors but also protects your system from potential file corruption, malware attacks, and hardware failures. It optimizes your device for peak performance and prevents future issues:
- Download and Install the Exe and Dll File Repair Tool (Compatible with Windows 11/10, 8, 7, XP, Vista).
- Click Start Scan to identify the issues with exe and dll files.
- Click Repair All to fix all identified issues.

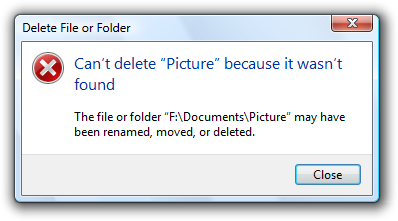
Issues with deleting windir network diagnostic xpnetdiag exe
If you are experiencing issues with deleting the windir network diagnostic xpnetdiag exe file, there are a few troubleshooting steps you can try.
First, make sure that you have administrative privileges on your computer. This will allow you to make changes to system files.
Next, try booting your computer into Safe Mode. This will prevent any unnecessary processes from running and may make it easier to delete the file.
If you still can’t delete the file, you can try using the command prompt. Open the command prompt (cmd.exe) as an administrator and navigate to the location of the file. Use the “del” command followed by the file name to delete it.
If all else fails, you can try using a third-party file deletion tool or seek assistance from a professional.
Running windir network diagnostic xpnetdiag exe in the background

To run the windir network diagnostic xpnetdiag.exe in the background, follow these steps:
1. Open the command prompt by pressing Win + R and typing cmd in the Run dialog box.
2. Navigate to the directory where the xpnetdiag.exe file is located using the cd command.
3. Once in the appropriate directory, type xpnetdiag.exe /background and press Enter. This will initiate the network diagnostic tool in the background.
4. You can continue using your computer while the diagnostic tool runs in the background. It will not interfere with your tasks or display any user interface.
5. After the diagnostic tool completes its analysis, it will generate a report that you can review later.
By running xpnetdiag.exe in the background, you can troubleshoot network-related issues without interrupting your work. This can be especially helpful if you need to diagnose problems on a remote computer or if you prefer a non-intrusive troubleshooting experience.
Windir network diagnostic xpnetdiag exe not responding
First, try restarting your computer and see if that resolves the issue. Sometimes a simple reboot can fix temporary glitches.
If that doesn’t work, you can try running the xpnetdiag exe file as an administrator. Right-click on the file and select “Run as administrator” from the context menu.
Another option is to check for any updates or patches for the Windir network diagnostic tool. Visit the official website or look for updates through Windows Update.
If the problem persists, you can try reinstalling the Windir network diagnostic tool. Uninstall it from your computer and then download the latest version from a trusted source.
Recommended removal tools for windir network diagnostic xpnetdiag exe
- Step 1: Uninstall windir network diagnostic xpnetdiag exe from Control Panel
- Open Control Panel
- Click on Programs
- Select Uninstall a program
- Locate windir network diagnostic xpnetdiag exe in the list of installed programs
- Click on windir network diagnostic xpnetdiag exe
- Click on Uninstall or Remove
- Follow the on-screen prompts to complete the uninstallation process
- Step 2: Scan your computer with an antivirus software
- Open your preferred antivirus software
- Click on Scan or Full Scan
- Wait for the scan to complete
- If any threats are detected, follow the recommended actions to remove them
- Step 3: Use an anti-malware program to remove windir network diagnostic xpnetdiag exe
- Download and install a reputable anti-malware program
- Open the anti-malware program
- Click on Scan or Full Scan
- Wait for the scan to complete
- If any threats are detected, follow the recommended actions to remove them
- Step 4: Clear temporary files and folders
- Open the Run dialog box by pressing Win+R
- Type %temp% and press Enter
- Select all files and folders in the temporary folder
- Press Shift+Delete to permanently delete them
- Step 5: Restart your computer
- Click on the Start menu
- Select Restart or Shutdown
- Wait for your computer to shut down and then turn it back on
Startup behavior of windir network diagnostic xpnetdiag exe
When troubleshooting the windir network diagnostic xpnetdiag.exe startup behavior, there are a few key steps to follow.
First, ensure that the xpnetdiag.exe file is located in the correct directory. It should be found in the “windir” directory, which is typically “C:\Windows\”.
Next, check if any dynamic-link library (DLL) files that xpnetdiag.exe relies on are missing or corrupted. Use the Windows API functions to verify this.
If xpnetdiag.exe is not starting correctly, try restarting your computer. This can often resolve issues with startup programs.
If the problem persists, check for any error messages related to xpnetdiag.exe. These can provide valuable clues about what may be causing the issue.
Another helpful step is to run xpnetdiag.exe from the command prompt using the “cmd.exe” utility. This can provide more detailed information about any errors or problems encountered.
Finally, make sure that your computer’s hardware and environment variables are properly configured. These can sometimes affect the startup behavior of programs.
Compatibility with different Windows versions
![]()
To determine compatibility, follow these steps:
1. Check the system requirements: Verify that your Windows version meets the minimum requirements for running Xpnetdiag Exe.
2. Verify the file version: Right-click on the Xpnetdiag Exe file and select “Properties”. Under the “Details” tab, check the “File version” to ensure it matches the required version for your Windows version.
3. Update Windows: Make sure your Windows operating system is up to date with the latest patches and updates. This can help resolve any compatibility issues.
4. Compatibility mode: If you encounter compatibility issues, try running Xpnetdiag Exe in compatibility mode. Right-click on the file, select “Properties”, go to the “Compatibility” tab, and enable compatibility mode for the appropriate Windows version.
Malware risks associated with windir network diagnostic xpnetdiag exe
To protect yourself from these risks, it is crucial to be aware of potential symptoms and signs of malware infection. These may include sudden system slowdowns, frequent error messages, unexpected pop-ups, and unresponsive programs.
If you suspect that your system is infected with malware, it is important to take immediate action. Start by running a full system scan using reliable antivirus software. Additionally, avoid clicking on suspicious links or downloading files from untrusted sources. Regularly updating your operating system and software can also help prevent malware infections.
Alternatives to windir network diagnostic xpnetdiag exe
- Network Troubleshooter: Use the built-in network troubleshooter in Windows to diagnose and resolve network issues.
- Command Prompt: Utilize command prompt commands such as ipconfig, ping, and tracert to troubleshoot network connectivity problems.
- Network Adapter Reset: Reset the network adapter settings to their default configuration to fix any potential conflicts or misconfigurations.
- Update Network Drivers: Ensure that the network drivers are up to date by downloading the latest versions from the manufacturer’s website.
- Disable Firewall and Antivirus: Temporarily disable any firewall or antivirus software to check if they are causing conflicts with the network diagnostic tool.
- Run Network Diagnostic Tool as Administrator: Right-click on the xpnetdiag.exe file and select “Run as administrator” to give it elevated privileges.
- Perform System Restore: If the issue started recently, try performing a system restore to revert your computer’s settings to a previous working state.
- Reset TCP/IP Stack: Reset the TCP/IP stack to its default settings using the “netsh” command in Command Prompt.
- Check Network Cable and Connections: Ensure that the network cables are securely plugged in and there are no physical damages or loose connections.
- Disable Proxy Settings: Disable any proxy settings that might be interfering with the network diagnostic tool’s functionality.
Updating windir network diagnostic xpnetdiag exe
To update windir network diagnostic xpnetdiag exe, follow these steps:
1. Locate the xpnetdiag exe file on your computer.
2. Make sure you have the latest version of the file. If not, search for the latest version online.
3. Download the updated xpnetdiag exe file from a trusted source.
4. Back up the original xpnetdiag exe file in case anything goes wrong during the update.
5. Replace the old xpnetdiag exe file with the new one. You may need administrative privileges to do this.
6. Restart your computer to apply the changes.
7. Test the updated xpnetdiag exe to see if the issue has been resolved.
Downloading windir network diagnostic xpnetdiag exe
![]()
To troubleshoot issues with the Windir Network Diagnostic Xpnetdiag.exe file, follow these steps:
1. Ensure that you have the correct version of the file for your operating system. You can download the Windir Network Diagnostic Xpnetdiag.exe file from trusted sources online.
2. Save the downloaded file to a location on your computer.
3. Before running the file, make sure to close any open programs or applications.
4. Double-click on the downloaded file to start the installation process.
5. Follow the on-screen instructions to complete the installation.
6. Once the installation is complete, restart your computer.
7. After rebooting, try running the Windir Network Diagnostic Xpnetdiag.exe file again to see if the issue has been resolved.
If you continue to experience problems, you may need to seek further assistance from a computer technician or the software manufacturer.