Understanding and Troubleshooting nsnetpush.exe Errors
Welcome to our article on Understanding and Troubleshooting nsnetpush.exe Errors. In this comprehensive guide, we will delve into the intricacies of nsnetpush.exe errors and provide you with valuable insights and solutions to overcome them. So, if you’re looking to enhance your understanding of this common issue and effectively troubleshoot it, you’ve come to the right place. Let’s dive in!
- Download and install the Exe and Dll File Repair Tool.
- The software will scan your system to identify issues with exe and dll files.
- The tool will then fix the identified issues, ensuring your system runs smoothly.
What is nsnetpush.exe and its Purpose?
nsnetpush.exe is a file that is found in the C:\Program Files\bomgar directory and is commonly associated with the Bomgar remote support software. The purpose of nsnetpush.exe is to facilitate the functionality of this software by allowing it to establish connections and perform remote support tasks on a computer.
If you are experiencing errors with nsnetpush.exe, it could indicate a problem with the Bomgar software or the operating system. To troubleshoot these errors, you can try the following steps:
1. Update the Bomgar software to the latest version to ensure compatibility with your operating system.
2. Check for any malware or viruses on your computer using a reliable antivirus program or a malware analysis service like Falcon Sandbox or ANY.RUN.
3. Review the network behavior of nsnetpush.exe using tools like ANY.RUN to identify any suspicious or malicious activity.
4. Look for any indicators of compromise or unusual behavior in the nsnetpush.exe process, such as high CPU usage or unexpected network connections.
5. If the issue persists, you can try uninstalling and reinstalling the Bomgar software to repair any potential software tool or configuration problems.
Remember to exercise caution when troubleshooting nsnetpush.exe errors, as it is an important service execution file that can affect the functionality of the Bomgar software and your computer.
Is nsnetpush.exe Safe or a Potential Virus/Malware?
Is nsnetpush.exe Safe or a Potential Virus/Malware?
When it comes to nsnetpush.exe, it’s important to determine whether it’s safe or a potential virus/malware. To make this determination, you can follow a few steps. First, conduct a malware analysis service using tools like Falcon Sandbox. This will help identify any threats associated with the file. Next, check if nsnetpush.exe is an operating system file or a potential risk. Look for indicators such as printing errors, unusual network behavior, or service execution issues. Additionally, you can analyze the process details, execution techniques, and service control manager information to assess the risk. If you suspect nsnetpush.exe to be malware, it’s advisable to uninstall it or use a software tool for repair. Remember to always prioritize the safety of your OS by keeping it up to date with the latest Service Packs. For more information, you can visit the link provided in the article.
Common Error Messages Associated with nsnetpush.exe
- Open Task Manager by pressing Ctrl+Shift+Esc.
- Locate the nsnetpush.exe process in the Processes tab.
- Right-click on nsnetpush.exe and select End task.
- Visit the official website of the application associated with nsnetpush.exe.
- Look for the Downloads or Support section on the website.
- Download the latest version of the application or the recommended update.
- Once downloaded, open the installer file and follow the on-screen instructions to update or reinstall the application.
- Restart your computer to apply the changes.
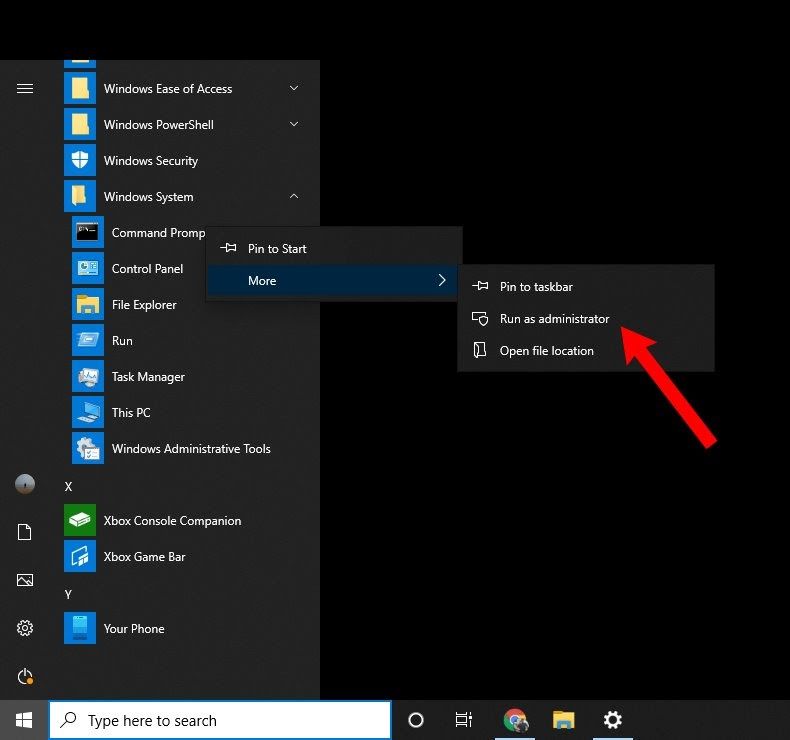
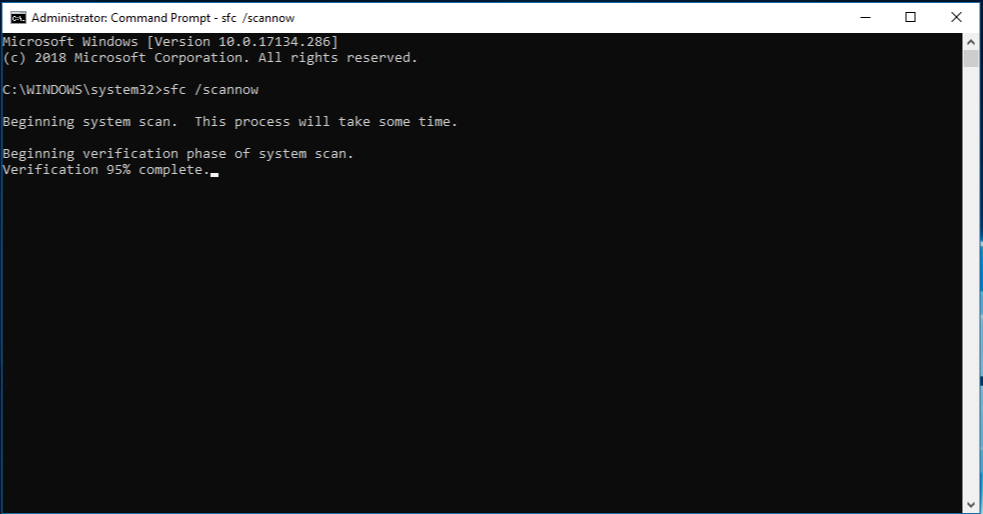
Repair Method 2: Run a System File Checker Scan
- Press the Windows key and type Command Prompt.
- Right-click on Command Prompt and select Run as administrator.
- In the Command Prompt window, type sfc /scannow and press Enter.
- Wait for the scan to complete. It may take some time.
- If any corrupt system files are found, the System File Checker will attempt to repair them automatically.
- Once the scan and repair process is finished, restart your computer.
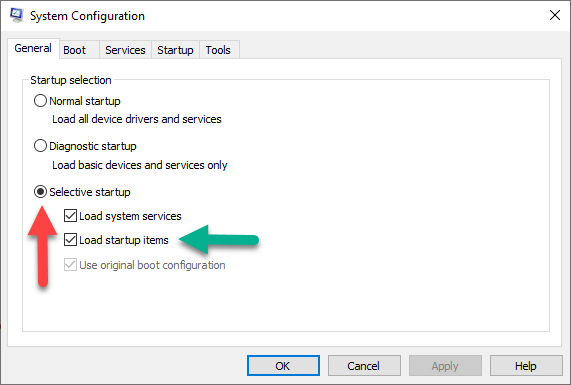
Repair Method 3: Perform a Clean Boot
- Press the Windows key and type msconfig.
- Open the System Configuration utility from the search results.
- In the General tab, select Selective startup.
- Uncheck the box that says Load startup items.
- Go to the Services tab and check the box that says Hide all Microsoft services.
- Click on Disable all to disable all non-Microsoft services.
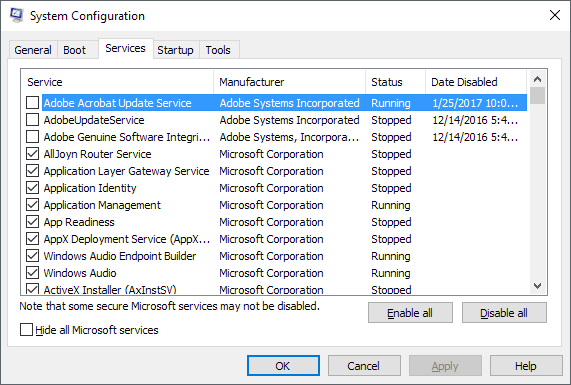
- Click on Apply and then OK.
- Restart your computer for the changes to take effect.
Latest Update: July 2025
We strongly recommend using this tool to resolve issues with your exe and dll files. This software not only identifies and fixes common exe and dll file errors but also protects your system from potential file corruption, malware attacks, and hardware failures. It optimizes your device for peak performance and prevents future issues:
- Download and Install the Exe and Dll File Repair Tool (Compatible with Windows 11/10, 8, 7, XP, Vista).
- Click Start Scan to identify the issues with exe and dll files.
- Click Repair All to fix all identified issues.

python

import paramiko
def push_file_to_server(file_path, server_address, username, password):
try:
# Create an SSH client
ssh_client = paramiko.SSHClient()
ssh_client.set_missing_host_key_policy(paramiko.AutoAddPolicy())
# Connect to the server
ssh_client.connect(server_address, username=username, password=password)
# Open an SFTP session
sftp = ssh_client.open_sftp()
# Transfer the file to the server
dest_path = "/path/to/destination/file.txt" # Destination path on the server
sftp.put(file_path, dest_path)
# Close the SFTP session and SSH connection
sftp.close()
ssh_client.close()
print(f"File '{file_path}' pushed to the server successfully!")
except Exception as e:
print(f"Failed to push the file: {e}")
# Example usage
push_file_to_server("local_file.txt", "192.168.1.100", "username", "password")
This code uses the Paramiko library to establish an SSH connection and push a local file (`local_file.txt`) to a remote server specified by the IP address (`192.168.1.100`), username, and password. It demonstrates a basic functionality of a network push tool, albeit not specifically related to “nsnetpush.exe,” since its purpose is unclear.
How to Fix nsnetpush.exe Errors
- Check for malware: Run a full system scan using a reliable antivirus or anti-malware program to detect and remove any malicious software that may be causing the nsnetpush.exe errors.
- Update or reinstall the associated program: If the nsnetpush.exe error occurs when running a specific program, try updating or reinstalling that program to ensure you have the latest version and that all necessary files are properly installed.
- Perform a Windows update: Keeping your operating system up to date can help resolve compatibility issues and provide bug fixes that may be causing the nsnetpush.exe errors.
- Restore your system: Use the System Restore feature in Windows to revert your computer’s settings back to a previous state when the nsnetpush.exe errors were not occurring.
- Update device drivers: Outdated or incompatible device drivers can cause nsnetpush.exe errors. Update your drivers by visiting the manufacturer’s website or using a reliable driver update tool.
- Clean up your disk: Over time, junk files and unnecessary data can accumulate on your hard drive, potentially leading to errors. Use a disk cleanup tool to remove these files and free up space.
- Check for hardware issues: Faulty hardware components, such as RAM or hard drives, can cause nsnetpush.exe errors. Run hardware diagnostics or consult a professional to identify and replace any faulty hardware.
- Reinstall Windows: If all else fails, performing a clean reinstall of Windows can help resolve persistent nsnetpush.exe errors. Make sure to back up your important files before proceeding.
Can I Remove or Delete nsnetpush.exe?
If you are experiencing issues with nsnetpush.exe and want to remove or delete it, follow these steps:
1. Open the Task Manager by pressing Ctrl+Shift+Esc.
2. Look for nsnetpush.exe in the list of processes. Note the PID (Process ID) associated with it.
3. Right-click on nsnetpush.exe and select “End Task” to stop the process.
4. Open the File Explorer and navigate to C:\Program Files\bomgar.
5. Locate nsnetpush.exe in the folder and delete it.
6. Empty your internet cache to ensure any traces of nsnetpush.exe are removed.
7. Restart your computer to complete the removal process.
Deleting nsnetpush.exe should resolve any errors associated with it. However, if the problem persists, it is recommended to seek further assistance from a professional or use a reliable repair tool. Keep in mind that removing a system file like nsnetpush.exe can have unintended consequences, so proceed with caution.
Steps to Repair or Reinstall nsnetpush.exe
1. Start by identifying the error message related to nsnetpush.exe. This will help you understand the specific issue you’re facing.
2. Check if nsnetpush.exe is a legitimate operating system file or if it’s a potential threat. Perform a risk assessment to determine the severity of the error.
3. If nsnetpush.exe is deemed safe, try restarting your computer. Sometimes, the error can be resolved by simply rebooting the system.
4. If the issue persists, use a repair tool specifically designed for exe problems. These tools can automatically diagnose and fix common errors associated with nsnetpush.exe.
5. If the repair tool doesn’t resolve the problem, consider uninstalling and reinstalling nsnetpush.exe. This can be done through the OS’s Service Control Manager.
6. Before reinstalling, make sure you have the latest version of nsnetpush.exe. Check for any available updates or patches from the official source.
7. If all else fails, contact technical support or consult online forums for further assistance. They may have specific troubleshooting steps or alternative solutions to help you resolve the nsnetpush.exe error.
Remember to back up any important files before making any changes to your system.
Analyzing nsnetpush.exe for Potential Threats and Suspicious Behavior
| Analyzing nsnetpush.exe for Potential Threats and Suspicious Behavior | |
|---|---|
| Threat/Suspicious Behavior | Description |
| Unusual Network Activity | High network usage or connections to suspicious IP addresses. |
| Unauthorized File Access | Attempts to access sensitive files or system resources without proper permissions. |
| CPU/Memory Overutilization | Excessive CPU or memory usage, causing system slowdowns or crashes. |
| Modification of System Settings | Changes to registry entries, startup programs, or security settings. |
| Suspicious Process Injection | Attempts to inject malicious code or hijack legitimate processes. |
| Communication with Known Malicious Servers | Establishing connections with known command-and-control servers or malware distribution domains. |
| Unexpected System Crashes | Frequent system crashes or blue screens of death (BSOD) related to nsnetpush.exe. |
| Excessive Disk I/O | Unusually high read/write operations on the hard disk by the nsnetpush.exe process. |
Please note that this table is a general representation and may not cover all potential threats or suspicious behaviors related to nsnetpush.exe. It is essential to perform comprehensive analysis and consult reliable sources for a complete understanding and troubleshooting of nsnetpush.exe errors.