
Managing Microsoft Defender with mpcmdrun exe
This article provides an overview of managing Microsoft Defender using the mpcmdrun.exe command-line tool.
- Download and install the Exe and Dll File Repair Tool.
- The software will scan your system to identify issues with exe and dll files.
- The tool will then fix the identified issues, ensuring your system runs smoothly.
Purpose of mpcmdrun exe
The purpose of mpcmdrun. exe is to manage Microsoft Defender, a software component in Windows 10 that provides security against threats such as malware. It is a command-line utility that allows users to perform various tasks related to Windows Security and Defender Antivirus. With mpcmdrun. exe, users can initiate scans, update security intelligence, and perform other functions using specific commands.
To use mpcmdrun. exe, open the command prompt and navigate to the directory where it is located (typically C: \Program Files\Windows Defender). From there, you can run commands such as “mpcmdrun. exe -Scan -ScanType 2” to perform a full system scan for malware.
By using this utility, users can easily manage and monitor the security of their PC and protect it from potential threats.
Origin and creator of mpcmdrun exe
The origin of mpcmdrun.exe can be traced back to Microsoft. It is a software component that is utilized in managing Microsoft Defender on Windows 10. This tool is an essential part of Windows Security and is used by people for network security monitoring and managing Defender Antivirus.
MpCmdRun.exe is a command-line tool that allows users to perform various functions and tasks related to malware protection. It can be accessed through the command prompt or the Windows Operating System. Some common tasks that can be accomplished using mpcmdrun.exe include scanning a file or system for malware, updating security intelligence, and performing a quick or full scan.
To invoke mpcmdrun.exe, you can simply open the command prompt and type “mpcmdrun” followed by the desired command. It can also be found in the C:\Program Files\Windows Defender directory. When using mpcmdrun.exe, it is important to ensure that you have the latest version of Microsoft Security Essentials or Windows Defender installed on your computer.
Is mpcmdrun exe safe and legitimate?
mpcmdrun.exe is a safe and legitimate file associated with Microsoft Defender. It is part of the Malware Protection Command Line Utility, which is used to manage Microsoft Defender through the command line.
To ensure safety and legitimacy, it is important to download mpcmdrun.exe from the official Microsoft website or trusted sources. The file is typically located in the C:\Program Files\Microsoft Security Antivirus directory.
You can use mpcmdrun.exe to perform various tasks such as scanning your computer for malware, updating definitions, and configuring Microsoft Defender settings. It is a powerful tool for managing and maintaining the security of your PC.
To utilize mpcmdrun.exe, open the Command Prompt and navigate to the directory where the file is located. Then, use the “mpcmdrun.exe” command followed by the desired action, such as “Scan -ScanType 3 -File C:\Path\filename” to scan a specific file.
python

import subprocess
def run_mpcmdrun(arguments):
try:
# Use subprocess.run to execute 'mpcmdrun.exe' with desired arguments
result = subprocess.run(['mpcmdrun.exe'] + arguments, capture_output=True, text=True)
# Access the output and return code
output = result.stdout
return_code = result.returncode
# Process the output or perform any desired actions
# ...
# Return the output and return code to the caller
return output, return_code
except FileNotFoundError:
# Handle the case when 'mpcmdrun.exe' is not found
print("Error: 'mpcmdrun.exe' not found.")
return None
# Example usage
arguments = ['-Scan', '-ScanType', '3']
output, return_code = run_mpcmdrun(arguments)
print("Output:")
print(output)
print("\nReturn Code:", return_code)
This sample code demonstrates a basic function `run_mpcmdrun` that executes “mpcmdrun.exe” with desired arguments using the `subprocess.run` method in Python. It captures the output and return code, which you can further process or use according to your requirements.
Please note that this is a general example, and the availability and usage of “mpcmdrun.exe” can vary based on the specific environment and Windows Defender configuration. Make sure to have the correct path to “mpcmdrun.exe” and adjust the code accordingly.
Understanding the function of mpcmdrun exe
The mpcmdrun.exe is a vital component of Microsoft Defender, specifically the Malware Protection Command Line Utility. It is used to manage and control various aspects of Microsoft Defender, such as scanning for malware, updating virus definitions, and performing other security-related tasks.
To invoke mpcmdrun.exe, open the command prompt or the Windows PowerShell and type “mpcmdrun.exe” followed by the desired command. For example, to initiate a scan, type “mpcmdrun.exe -scan -scanType 3 -file C:\ProgramData“.
This executable file is located in the “C:\Program Files\Windows Defender” folder. It is important to note that the file may be blocked by certain security applications or policies, so ensure that it has the necessary permissions to run.
Regularly updating virus definitions is crucial for effective malware protection. To update, use the command “mpcmdrun.exe -signatureupdate“.
Monitoring the mpcmdrun.exe process in the Task Manager can provide insights into its performance and resource usage.
By understanding the function of mpcmdrun.exe, users can effectively manage and utilize Microsoft Defender to enhance network security and protect against malware threats.
Troubleshooting mpcmdrun exe not responding
If you are experiencing issues with mpcmdrun.exe not responding, there are a few troubleshooting steps you can try.
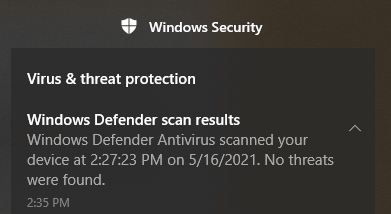
First, make sure you are running the latest version of Microsoft Defender on your Windows Operating System. You can check for updates through the Windows Security app.
If that doesn’t resolve the issue, try restarting your computer and then running a scan using mpcmdrun.exe. Open the command prompt by typing “cmd” in the Start menu search bar, then enter “mpcmdrun.exe -Scan -ScanType 3“.
If mpcmdrun.exe still isn’t responding, you can try ending the process in the Task Manager. Press Ctrl + Shift + Esc to open the Task Manager, locate mpcmdrun.exe under the Processes tab, right-click on it, and select “End Task”.
If none of these troubleshooting steps work, it may be helpful to reach out to Microsoft Support for further assistance.
High CPU usage caused by mpcmdrun exe
If you are experiencing high CPU usage caused by mpcmdrun.exe, here are some steps to manage Microsoft Defender and address the issue:
1. Open the Command Prompt by pressing Win + R and typing “cmd” in the Run dialog.
2. Type “mpcmdrun.exe -? ” to see a list of available commands and their descriptions.
3. Use “mpcmdrun.exe -removedefinitions ” to remove old virus and malware definitions.
4. Run “mpcmdrun.exe -SignatureUpdate ” to update your virus and malware definitions.
5. Use “mpcmdrun.exe -Scan ” followed by the “-ScanType ” command to perform a specific type of scan (Quick, Full, or Custom).
6. Monitor the scan progress and wait for it to complete.
7. Finally, restart your computer to see if the high CPU usage issue has been resolved.
How to remove mpcmdrun exe
To remove mpcmdrun.exe from your system, follow these steps:
1. Open the Command Prompt as an administrator.
2. Type “cd C:\ProgramData\Microsoft\Windows Defender” and press Enter.
3. Enter “mpcmdrun.exe -RemoveDefinitions -All” to remove all existing antivirus definitions.
4. Wait for the process to complete.
5. Next, enter “mpcmdrun.exe -SignatureUpdate” to update the antivirus signatures.
6. Allow the update to finish.
7. Finally, enter “mpcmdrun.exe -Scan -ScanType 3 -File “filename”“, replacing “filename” with the path and name of the file you want to scan.
8. The scan will start, and any threats found will be displayed.
Associated software and system files with mpcmdrun exe
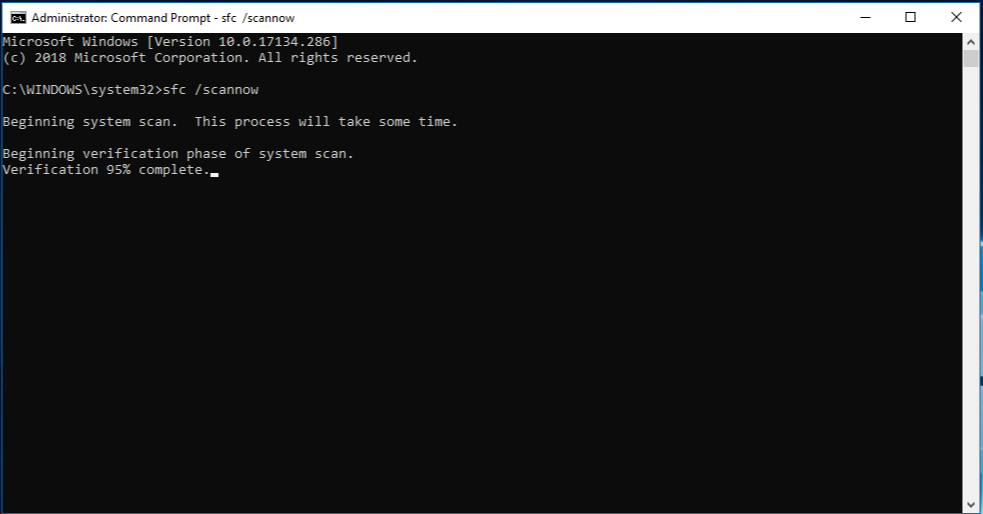
- Check for missing or corrupted files
- Open the Command Prompt by pressing Windows Key + X and selecting Command Prompt (Admin) or Windows PowerShell (Admin)

- Type the command sfc /scannow and press Enter
- Wait for the system file checker to scan and repair any missing or corrupted files
- Restart your computer
- Perform a clean boot
- Press Windows Key + R to open the Run dialog box
- Type msconfig and press Enter
- In the System Configuration window, go to the Services tab
- Check the box next to Hide all Microsoft services
- Click on Disable all
- Go to the Startup tab

- Click on Open Task Manager
- In the Task Manager window, disable all startup items by right-clicking on each item and selecting Disable
- Close the Task Manager
- Go back to the System Configuration window and click on OK
- Restart your computer
- Reinstall Microsoft Defender
- Press Windows Key + X and select Windows PowerShell (Admin)
- Type the command Get-MpPreference | Remove-MpPreference and press Enter
- Wait for the command to complete and restart your computer
- Open the Microsoft Store
- Search for Microsoft Defender
- Click on Microsoft Defender Antivirus and select Install
- Wait for the installation to complete
- Restart your computer
Can’t delete mpcmdrun exe? Troubleshooting tips
If you’re having trouble deleting the mpcmdrun.exe file, here are some troubleshooting tips for managing Microsoft Defender:
1. Check for running processes: Make sure there are no active instances of mpcmdrun.exe running in the background. Use the Task Manager to end any related processes.
2. Disable real-time protection: Temporarily disable real-time protection in Microsoft Defender. Open the Windows Security app, go to Virus & Threat Protection settings, and turn off real-time protection.
3. Run a scan: Perform a full scan using mpcmdrun.exe to check for any malware or threats. Open Command Prompt as an administrator and enter “mpcmdrun.exe /scan” to initiate the scan.
4. Try Safe Mode: Boot your computer into Safe Mode and attempt to delete mpcmdrun.exe from there. This can help bypass any processes or applications that may be interfering.
5. Use an uninstaller tool: Consider using a third-party uninstaller tool to remove mpcmdrun.exe if all else fails. These tools are specifically designed to handle stubborn files and programs.
Latest Update: July 2025
We strongly recommend using this tool to resolve issues with your exe and dll files. This software not only identifies and fixes common exe and dll file errors but also protects your system from potential file corruption, malware attacks, and hardware failures. It optimizes your device for peak performance and prevents future issues:
- Download and Install the Exe and Dll File Repair Tool (Compatible with Windows 11/10, 8, 7, XP, Vista).
- Click Start Scan to identify the issues with exe and dll files.
- Click Repair All to fix all identified issues.

Impact of mpcmdrun exe on system performance
The mpcmdrun.exe file plays a crucial role in managing Microsoft Defender and can impact system performance. When using this executable, it is essential to understand its effects and how to optimize performance.
To begin, it is important to note that mpcmdrun.exe is the command-line utility for Microsoft Defender Antivirus. It allows users to perform various tasks such as initiating scans, updating definitions, and configuring settings.
When running a scan with mpcmdrun.exe, it is advisable to use the “/scan” command along with the appropriate parameters to target specific files or folders. This helps to minimize the impact on system performance by avoiding unnecessary scans.
In addition, it is worth considering the scan options available with mpcmdrun.exe. For example, using the “/quickscan” command allows for a faster scan that focuses on commonly infected areas. Conversely, the “/fullscan” command thoroughly examines the entire system but may take longer.
Furthermore, it is crucial to schedule scans during periods of low system activity to minimize disruption. This can be achieved by using the “/schedule” command followed by the desired scan frequency.
Startup behavior of mpcmdrun exe
When using the mpcmdrun.exe tool to manage Microsoft Defender, it is important to understand the startup behavior. This tool allows you to scan your system for malware and perform other security tasks.
To initiate a scan, simply open a command prompt and type “mpcmdrun.exe /Scan“. This will start a quick scan of your system.
If you want a more thorough scan, you can use the “/Scan -Full” command. This will scan all files and processes on your computer, including those in memory.
Additionally, you can use the “/Scan -Custom [file or folder path]” command to scan a specific file or folder.
It’s worth noting that the mpcmdrun.exe tool is only available on Windows platforms and is not compatible with Microsoft Security Essentials.
By understanding the startup behavior of mpcmdrun.exe, you can effectively manage Microsoft Defender and ensure the security of your system.
Update and download options for mpcmdrun exe
- What is mpcmdrun exe: A command-line tool for managing Microsoft Defender on Windows.
- Update options: Use the
mpcmdrun.exe -SignatureUpdatecommand to manually update Microsoft Defender signatures.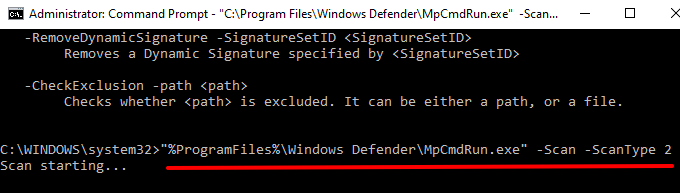
- Download options: Use the
mpcmdrun.exe -DownloadFilecommand to download the latest Microsoft Defender definition files. - Offline update: The
mpcmdrun.exe -SignatureUpdate -MMPCcommand allows you to update Microsoft Defender using an offline computer. - Scheduled updates: Set up scheduled tasks using the
schtasks.execommand along with mpcmdrun.exe to automate signature updates.
Compatibility of mpcmdrun exe with different Windows versions
- Step 1: Determine the version of Windows you are using.
- Click on the Start button.
- Type “winver” in the search bar and press Enter.
- A window will appear displaying the version of Windows installed on your system.
- Step 2: Check the compatibility of mpcmdrun exe with your Windows version.
- Visit the official Microsoft Defender Antivirus website.
- Look for the section that provides information about the compatibility of mpcmdrun exe with different Windows versions.
- Compare your Windows version with the compatibility list provided.
- Step 3: Update Windows if necessary.
- Click on the Start button.
- Type “Windows Update” in the search bar and press Enter.
- Click on “Check for updates“.
- If updates are available, click on “Install now” to start the update process.
- Wait for the updates to be installed and restart your computer if prompted.
- Step 4: Download the correct version of mpcmdrun exe.
- Visit the official Microsoft Defender Antivirus website.
- Look for the section that provides downloads for mpcmdrun exe.
- Select the version that is compatible with your Windows version.
- Click on the download link to initiate the download.
- Save the downloaded file to a location on your computer.
- Step 5: Install mpcmdrun exe.
- Navigate to the location where the downloaded mpcmdrun exe file is saved.
- Double-click on the file to start the installation process.

- Follow the on-screen instructions to complete the installation.
- Once the installation is finished, mpcmdrun exe will be ready to use on your Windows version.
Alternatives to mpcmdrun exe for similar functions
- Open PowerShell by pressing Windows Key + X and selecting Windows PowerShell (Admin).
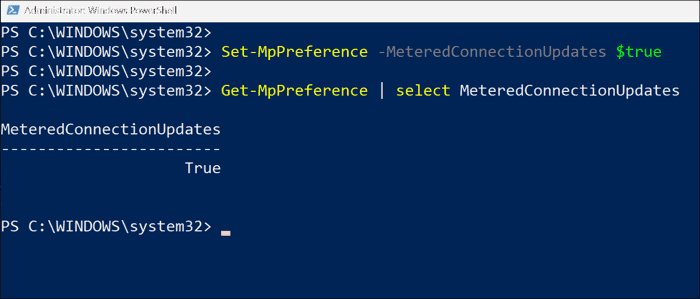
- Run the command Set-MpPreference -DisableRealtimeMonitoring $true to disable real-time monitoring.

- Run the command Set-MpPreference -DisableIOAVProtection $true to disable IOAV (Internet Outbound/Inbound Protection) protection.
- Run the command Set-MpPreference -DisableIntrusionPreventionSystem $true to disable the Intrusion Prevention System.
- Run the command Set-MpPreference -DisableScriptScanning $true to disable script scanning.
- Run the command Set-MpPreference -DisableArchiveScanning $true to disable archive scanning.
- Run the command Set-MpPreference -DisableBehaviorMonitoring $true to disable behavior monitoring.
- Run the command Set-MpPreference -DisableRemovableDriveScanning $true to disable removable drive scanning.
- Run the command Set-MpPreference -DisableEmailScanning $true to disable email scanning.
- Run the command Set-MpPreference -DisableAntiSpyware $true to disable the anti-spyware feature.
- Run the command Set-MpPreference -DisableAutoExclusions $true to disable automatic exclusions.
- Run the command Set-MpPreference -DisableBlockAtFirstSeen $true to disable blocking at first sight.
- Run the command Set-MpPreference -DisableIntrusionPreventionSystem $true to disable the Intrusion Prevention System.
- Run the command Set-MpPreference -DisableIOAVProtection $true to disable IOAV (Internet Outbound/Inbound Protection) protection.
- Run the command Set-MpPreference -DisablePrivacyMode $true to disable privacy mode.
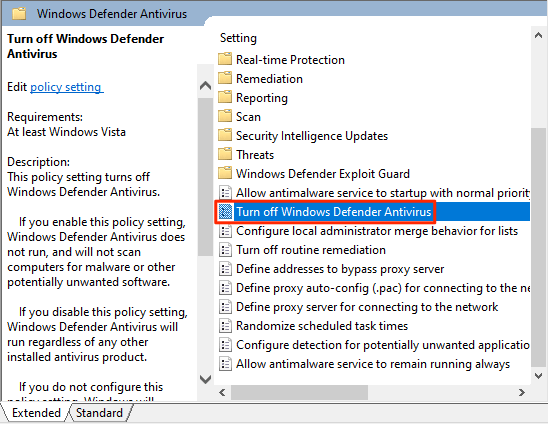
Repair Method 2: Using Group Policy Editor
- Press Windows Key + R to open the Run dialog box.
- Type gpedit.msc and press Enter to open the Group Policy Editor.
- In the Group Policy Editor, navigate to Computer Configuration > Administrative Templates > Windows Components > Windows Defender Antivirus.
- Double-click on Turn off Windows Defender Antivirus policy.
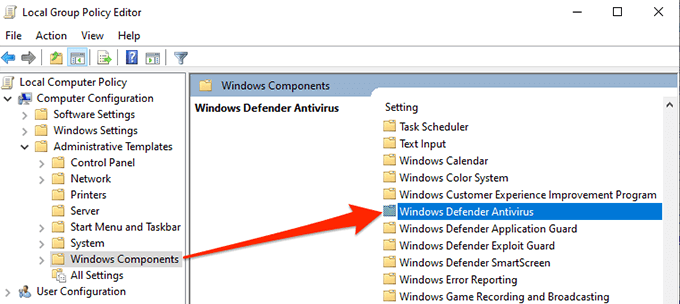
- Select Enabled to turn off Windows Defender Antivirus.
- Click on Apply and then on OK.
Repair Method 3: Using Registry Editor
- Press Windows Key + R to open the Run dialog box.
- Type regedit and press Enter to open the Registry Editor.
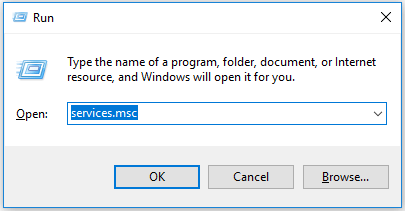
- In the Registry Editor, navigate to HKEY_LOCAL_MACHINE\SOFTWARE\Policies\Microsoft\Windows Defender.
- If the Windows Defender key doesn’t exist, right-click on Microsoft and select New > Key to create a new key named Windows Defender.
- Right-click on the Windows Defender key and select New > DWORD (32-bit) Value.
- Name the new value DisableAntiSpyware.
- Double-click on DisableAntiSpyware and set the Value data to 1.
- Click on OK.
Understanding the usage of mpcmdrun exe
mpcmdrun.exe is a command-line tool that allows you to manage Microsoft Defender on your Windows computer. It provides various functionalities to help you take control of your system’s security.
To scan your computer for malware or viruses, use the command “mpcmdrun.exe -Scan“. This will initiate a scan and provide you with a detailed report of any threats found.
You can also use mpcmdrun.exe to update your Microsoft Defender definitions. Simply run “mpcmdrun.exe -SignatureUpdate” to ensure you have the latest protection against emerging threats.
For advanced users, mpcmdrun.exe offers additional options such as scheduling scans, excluding specific files or folders from scanning, and managing real-time protection settings.
By understanding the usage of mpcmdrun.exe, you can effectively manage and enhance your Microsoft Defender’s performance, ensuring the security of your system and protecting it from potential threats.
Malware risks associated with mpcmdrun exe
Mpcmdrun.exe is a crucial component of Microsoft Defender, but it can also pose malware risks if not managed properly. To mitigate these risks, follow these guidelines:
1. Keep your Microsoft Defender up to date to ensure it can effectively detect and remove malware.
2. Regularly scan your system using mpcmdrun.exe to identify any potential threats.
3. Use the proper command line syntax when invoking mpcmdrun.exe to ensure accurate and efficient scanning.
4. Be cautious when granting network input access to mpcmdrun.exe, as it can potentially be exploited by malicious actors.
5. Monitor your network security to detect any suspicious activities related to mpcmdrun.exe.
6. Beware of unauthorized apps or spying apps that may attempt to mimic mpcmdrun.exe and compromise your system.
7. Verify the Microsoft Windows Publisher for mpcmdrun.exe to ensure its legitimacy.
8. Familiarize yourself with the Endpoint Protection Plan offered by Microsoft to enhance your overall security.
Is it safe to end task mpcmdrun exe?
When it comes to ending the task of mpcmdrun.exe, it is generally safe to do so. This process is responsible for running Microsoft Defender scans and updates on your system. However, there are a few things to keep in mind.
First, make sure you have a good reason to end the task. Ending it unnecessarily may leave your system vulnerable to malware and other threats.
If you are experiencing issues with mpcmdrun.exe, such as high CPU usage or freezing, it may be worth ending the task to troubleshoot the problem.
To end the task, follow these steps:
1. Press Ctrl + Shift + Esc to open the Task Manager.
2. Go to the Processes tab.
3. Locate mpcmdrun.exe in the list.
4. Right-click on it and select End task.
Keep in mind that ending the task will temporarily stop any ongoing scans or updates. It is recommended to restart your system after ending the task to ensure that Microsoft Defender functions properly.
Description of mpcmdrun exe process
The mpcmdrun.exe process is a crucial component of managing Microsoft Defender. It allows users to execute various commands to control and monitor the Microsoft Defender antivirus software.
To use mpcmdrun.exe effectively, open the command prompt and run “mpcmdrun.exe -?” to view a list of available options. This will help you perform tasks such as initiating scans, updating definitions, and configuring settings.
For example, you can run “mpcmdrun.exe -scan -scantype 2” to perform a full scan or “mpcmdrun.exe -SignatureUpdate” to update virus definitions.
By understanding the different commands and their invocation, you can fully utilize mpcmdrun.exe to enhance your network security. It is important to note that mpcmdrun.exe is only available on Microsoft Windows platforms.
Take advantage of mpcmdrun.exe to efficiently manage Microsoft Defender and protect your system from malware, spyware apps, and other threats.
Removal tool for mpcmdrun exe
To remove mpcmdrun.exe, the removal tool can be used. Here’s how you can manage Microsoft Defender with mpcmdrun.exe:
1. Open the Command Prompt as an administrator.
2. Navigate to the directory where mpcmdrun.exe is located.
3. Use the command “mpcmdrun.exe -removedefinitions -all” to remove all the malware and spyware definitions.
4. Wait for the process to complete and confirm the removal when prompted.
5. Next, use the command “mpcmdrun.exe -scan -scantype 3” to perform a full scan on your system.
6. Let the scan complete and follow the instructions provided by Microsoft Defender.
7. Once the scan is finished, review the results and take appropriate actions to remove any detected threats.
8. Keep Microsoft Defender updated by regularly running “mpcmdrun.exe -SignatureUpdate“.
Evaluating the safety of mpcmdrun exe
When evaluating the safety of mpcmdrun.exe, there are a few important factors to consider. First, it’s crucial to verify the source of the file. Check the Microsoft Windows Publisher to ensure it’s legitimate. Next, utilize a network security monitor to track any suspicious activity related to mpcmdrun.exe. Additionally, be cautious of any unauthorized invocation of the file.
To further enhance safety, regularly scan mpcmdrun.exe using your Endpoint Plan or Security Antivirus software. This will help identify any potential threats or malware. It’s also advisable to review network input and outgoing data to detect any signs of unauthorized access or communication.
By following these steps and staying vigilant, you can effectively manage Microsoft Defender with mpcmdrun.exe and protect your system from potential risks or spying apps.
