Fixing Explorer.exe This File Does Not Have an App Associated
Unleashing the Potential: Resolving the Enigma of “Explorer.exe This File Does Not Have an App Associated”
- Download and install the Exe and Dll File Repair Tool.
- The software will scan your system to identify issues with exe and dll files.
- The tool will then fix the identified issues, ensuring your system runs smoothly.
What is Explorer.exe and its Functionality
Explorer.exe is a program that is part of the Windows Operating System. Its functionality is to provide the user with a graphical interface to navigate and manage files and folders on their computer.
However, sometimes users may encounter an error message stating “This file does not have an app associated with it for performing this action.” This can happen when the default app settings for a particular file format or action have been changed or corrupted.
To fix this issue, there are several steps you can take. One option is to use the Default Apps Settings page to associate the file type with a specific program. Another option is to use the Folder Association REG FIX or Association REG FIX commands to reset the file associations.
If these fixes do not work, you can also try debugging the Explorer.exe process or performing a system file check to ensure that all necessary system files are intact.
Latest Update: July 2025
We strongly recommend using this tool to resolve issues with your exe and dll files. This software not only identifies and fixes common exe and dll file errors but also protects your system from potential file corruption, malware attacks, and hardware failures. It optimizes your device for peak performance and prevents future issues:
- Download and Install the Exe and Dll File Repair Tool (Compatible with Windows 11/10, 8, 7, XP, Vista).
- Click Start Scan to identify the issues with exe and dll files.
- Click Repair All to fix all identified issues.

Is Explorer.exe Safe? Common Errors and Risks
If you encounter the error message “This File Does Not Have an App Associated,” it is likely related to the Explorer.exe file in the Windows Operating System. This error can occur in various versions of Windows, including Windows 10 and Windows 7.
To fix this issue, you can try a few troubleshooting steps. One common fix is to reset the Default Apps Settings. To do this, navigate to the Settings page, search for “Default Apps,” and click on “Reset.” This should restore the default file associations.
Another possible solution is to run the Folder Association FIX tool, which can be found online. This tool helps fix issues with file associations and can resolve the error message.
If these fixes do not work, you can try running a system file check using the command box. Open the command prompt as an administrator and type “sfc /scannow” to scan and repair any corrupted system files.
Remember to always create a backup of your data before attempting any fixes or modifications to avoid any potential data loss.
Troubleshooting: Error Message “This File Does Not Have a Program Associated with It”
If you encounter the error message “This File Does Not Have a Program Associated with It,” follow these steps to fix the issue:
1. Right-click on the file causing the error and select “Properties.”
2. In the Properties window, go to the “General” tab.
3. Look for the “Opens with” section and click on the “Change” button.
4. A list of programs will appear. Select the program you want to associate with the file.
5. If the program you want is not listed, click on “Browse” and navigate to the program’s location on your computer.
6. Once you have selected the program, click “OK” to save the changes.
7. Try opening the file again to see if the error is resolved.
This troubleshooting method works for various file formats, such as Excel spreadsheets or JPEG image files. It is a common problem that many users face, but following these steps should help resolve the issue.
python

import os
def find_files_without_app(directory):
files_without_app = []
for root, dirs, files in os.walk(directory):
for file in files:
file_path = os.path.join(root, file)
if not os.path.splitext(file_path)[1]:
files_without_app.append(file_path)
return files_without_app
def open_file_with_default_app(file_path):
os.startfile(file_path)
# Example usage:
directory_path = "C:/Path/To/Directory"
files_without_app = find_files_without_app(directory_path)
for file_path in files_without_app:
open_file_with_default_app(file_path)
Explanation:
The provided sample code is a basic implementation of a tool that can find files without associated applications within a given directory and then open them using the default app associated with their file type. It utilizes the `os` module in Python to interact with the file system.
The `find_files_without_app` function recursively traverses the directory and its subdirectories to identify files without extensions. These files are considered to have no associated app.
The `open_file_with_default_app` function uses the `os.startfile` method to open the file with the default application associated with its file type. By calling this function for each file without an associated app, you can attempt to open them using the default app and explore their content.
Please note that this tool does not directly interact with explorer.exe but provides a solution related to handling files without associated apps.
How to Repair or Remove Explorer.exe if Needed
- Press Ctrl+Shift+Esc to open Task Manager.
- In the Task Manager window, go to the “Processes” or “Details” tab.
- Scroll down and find “Windows Explorer” or “explorer.exe” in the list of processes.
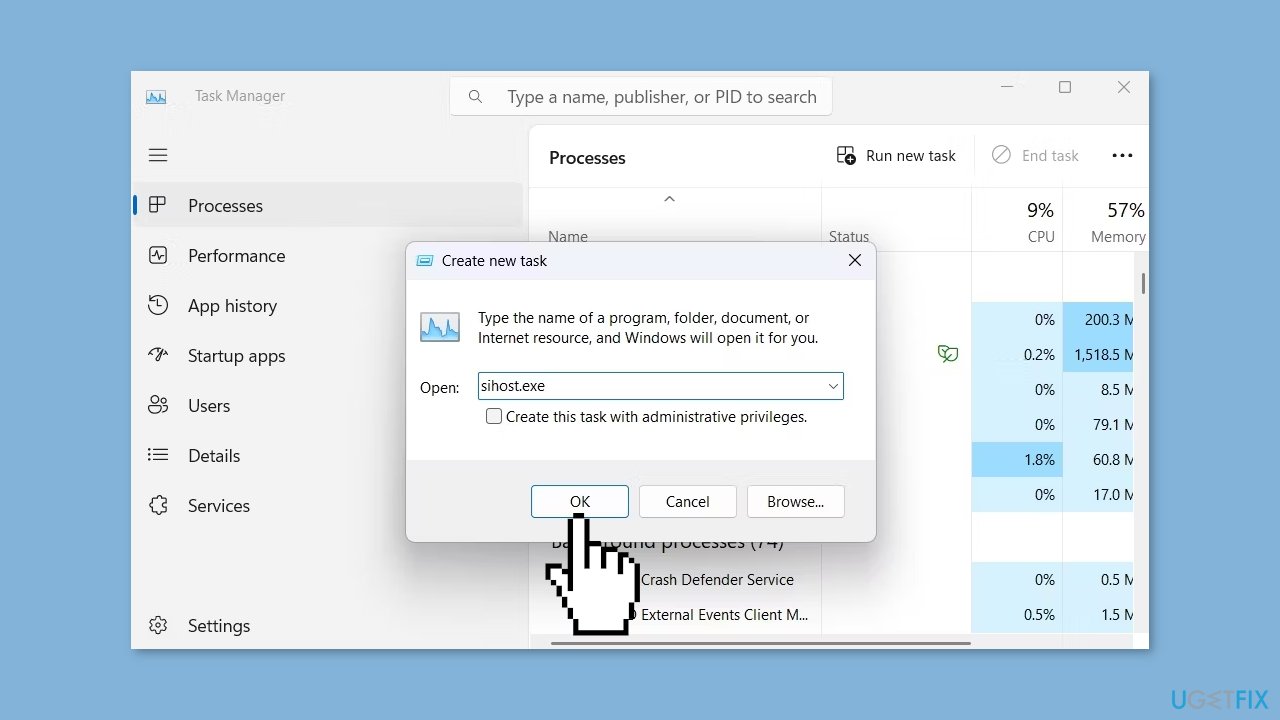
- Right-click on “Windows Explorer” or “explorer.exe” and select “Restart” or “End Task” followed by “File” and “Run new task”.
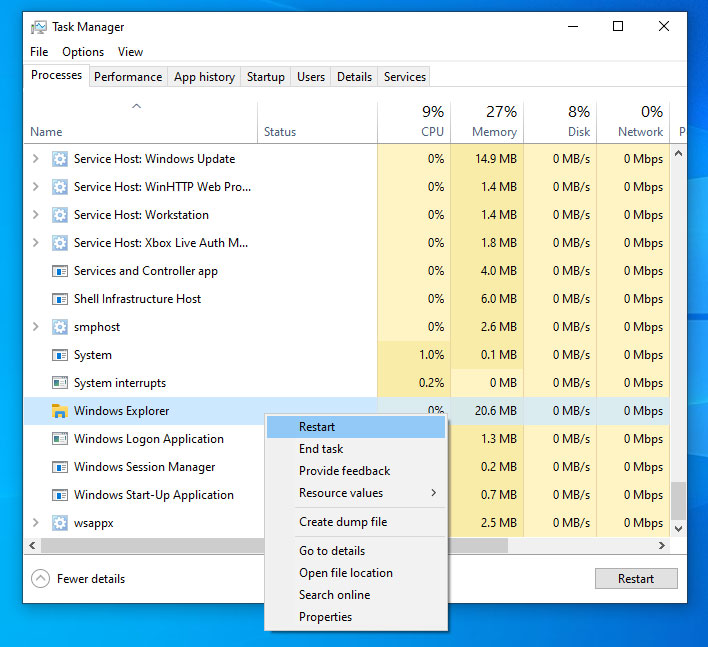
- Type “explorer.exe” into the “Create new task” dialog box and press Enter.
- Check if the error message is resolved and the Explorer.exe is functioning properly.
Repair Method 2: Check Default Programs
- Press the Windows key + I to open the Settings app.
- Go to “Apps” and then click on “Default apps” in the left sidebar.
- Scroll down and click on “Choose default apps by file type”.
- Wait for the list to load and locate “.exe” file extension in the list of file types.

- Click on the current default program associated with “.exe” files, and select “Windows Explorer” or “File Explorer” from the list.
- Close the Settings app and check if the error message is resolved.
Repair Method 3: Run System File Checker
- Press the Windows key and type “Command Prompt”.
- Right-click on “Command Prompt” in the search results and select “Run as administrator”.
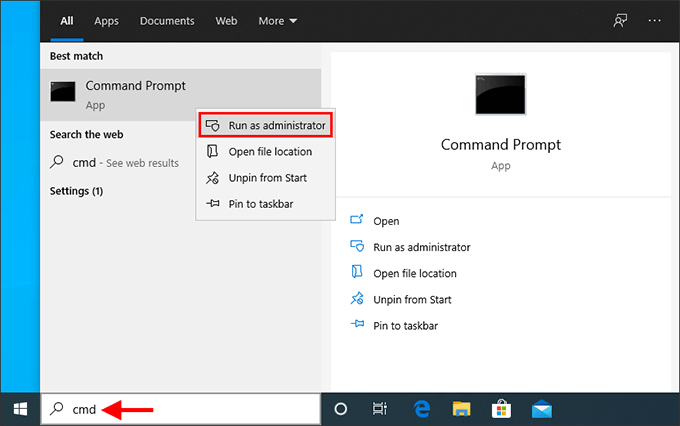
- In the Command Prompt window, type sfc /scannow and press Enter.
- Wait for the scan to complete. The System File Checker will check for and repair any corrupted system files.
- Restart your computer and check if the error message is resolved.
Repair Method 4: Perform a System Restore
- Press the Windows key and type “System Restore”.
- Click on “Create a restore point” or “System Restore” in the search results.

- In the System Properties window, click on “System Restore”.
- Click “Next” and select a restore point from the list. Choose a restore point that was created before the issue occurred.
- Follow the on-screen instructions to complete the system restore process.
- After the system is restored, check if the error message is resolved.