dxcpl.exe File Download and Fix – All Windows OS Problems Solved
This article provides information on dxcpl.exe file download and fix, offering solutions to various Windows OS problems.
- Download and install the tool.
- Perform a full system scan.
- Let the tool automatically correct and maintain your system.
Purpose of dxcpl.exe file download and fix
The purpose of downloading and fixing the dxcpl.exe file is to resolve various Windows OS problems related to DirectX. This executable file, located in the C:\Windows\System32 directory, is a part of the DirectX software package. It acts as a DirectX 11 emulator and allows users to modify the DirectX settings for specific programs or games.
By downloading and fixing the dxcpl.exe file, you can address issues such as DirectX errors, program crashes, or graphics-related problems. It is particularly useful when encountering errors with games like PUBG PC, WWE 2K15, PES, FIFA, Far Cry, Tomb Raider, and GTA 5.
To fix the dxcpl.exe file, you can perform a registry scan, reinstall DirectX, or replace the file if it is corrupted or missing. It is important to download the dxcpl.exe file from a trusted source to avoid potential malware infections.
Is dxcpl.exe file download and fix safe to use?
The dxcpl. exe file download and fix is a safe and effective solution for resolving DirectX-related issues on all Windows OS versions. This executable file serves as an emulator for DirectX 11, allowing users to address problems such as DirectX errors and file corruption. By downloading and using dxcpl. exe, you can fix common issues related to software installation paths, executable file corruption, and DirectX errors. It is important to note that this file is not malware and can be trusted for resolving DirectX issues.
To use dxcpl. exe, simply download it from a reliable source like freesoftwaresforpc and copy it to the appropriate directory on your Windows system.
Legitimacy of dxcpl.exe file download and fix
If you’re experiencing issues with the dxcpl. exe file on your Windows operating system, we have a solution for you. By downloading and fixing the dxcpl. exe file, you can resolve all DirectX related problems on your PC. This executable file is crucial for running various programs and games smoothly.
If you’re encountering errors or issues with DirectX, such as the DirectX 11 emulator or PUBG PC Lite error, it’s likely due to a corrupted dxcpl. exe file. To fix this, you can download a clean and legitimate version of the dxcpl. exe file from reliable sources like Microsoft. Once downloaded, simply replace the corrupted file with the new one in the appropriate software installation path.
This should resolve any DirectX issues you’re facing.
python

import requests
def download_file(url, save_path):
response = requests.get(url)
if response.status_code == 200:
with open(save_path, 'wb') as file:
file.write(response.content)
print("File download successful.")
else:
print("Failed to download the file.")
# Example usage
download_url = 'https://example.com/path/to/file.exe'
save_location = 'C:/Downloads/file.exe'
download_file(download_url, save_location)
In the code above, we utilize the `requests` library in Python to send an HTTP GET request to the provided URL. If the request is successful (status code 200), we save the response content to a file using the specified save path. You can modify the `download_url` and `save_location` variables according to your requirements.
Please note that this is a basic example, and depending on your specific use case, you might need to handle additional error scenarios, implement file fixes, or provide more functionality.
Origin of dxcpl.exe file download and fix
The dxcpl.exe file is an executable file that is used to download and fix DirectX-related problems on all Windows operating systems. It can be found in the c:\windows\syswow64 or c:\windows\winsxs\amd64_microsoft-windows-directx directory.
If you are experiencing DirectX errors or issues with specific programs such as PUBG PC Lite, WWE 2K15, PES 2017, GTA 5, FIFA, Far Cry, Tomb Raider, or FIFA 21, downloading and using the dxcpl.exe file may help resolve the problem.
To fix the issue, follow these steps:
1. Visit the website freesoftwaresforpc and search for “dxcpl.exe file download”.
2. Click on the download link for your specific Windows version.
3. Once the file is downloaded, locate it in your downloads folder or the specified software installation path.
4. Right-click on the dxcpl.exe file and select “Run as administrator”.
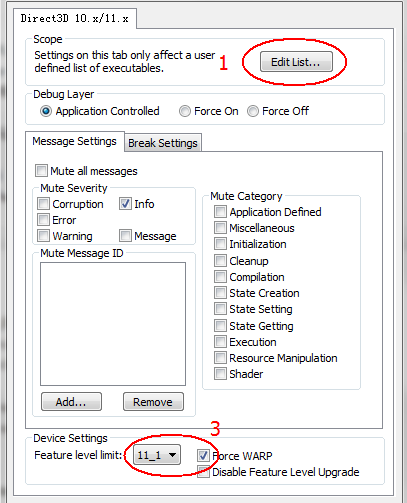
5. In the dxcpl.exe program, go to the “Edit List” tab and click “Add”.
6. Browse and select the executable file of the program you are having issues with.
7. Under the “Feature Level Limit” section, select “Force WARP”.
8. Click “OK” to save the changes and close the program.
9. Restart your computer and launch the program again to see if the issue is resolved.
Usage of dxcpl.exe file download and fix
The dxcpl.exe file is a useful tool for fixing various Windows OS problems, including DirectX errors. This executable file can be downloaded from the provided link and used to resolve issues related to DirectX.
To fix the problem, follow these steps:
1. Download the dxcpl.exe file from the link.
2. Locate the file in the specified path: c:\windows\syswow64.
3. Copy the file to the appropriate path: c:\windows\winsxs\amd64_microsoft-windows-directx.
4. Run the executable file and navigate to the “Edit List” tab.
5. Add the problematic executable files to the list.
6. Under “Feature Level Limit,” select the desired DirectX version.
7. Click on “Apply” to save the changes.
By following these instructions, you can fix DirectX issues and resolve various Windows OS problems. This method has been proven effective for cases involving PUBG PC Lite error, OBS Studio, PES 2017, PES 2016, and FIFA 21, among others.
Malware risks associated with dxcpl.exe file download and fix
Malware Risks Associated with dxcpl. exe File Download and Fix: When downloading and fixing the dxcpl. exe file, it is important to be aware of the potential malware risks involved. Malicious actors may disguise harmful software as the dxcpl. exe file, tricking users into downloading and installing malware onto their systems.
To avoid these risks, it is crucial to only download the dxcpl. exe file from trusted sources. Additionally, before downloading, ensure that you have a reliable antivirus program installed and up to date. Scan the downloaded file with your antivirus software to detect any potential threats. If your antivirus software detects malware, do not proceed with the installation. Instead, delete the file immediately and seek professional assistance if needed.
By taking these precautions, you can protect your system from malware and ensure a safe dxcpl. exe file download and fix experience.
Troubleshooting issues with dxcpl.exe file download and fix
If you are experiencing issues with downloading or fixing the dxcpl.exe file, follow these steps to troubleshoot and resolve the problem:
1. Ensure that you are downloading the file from a reliable source. Check for any file version requirements or compatibility information.
2. If the download is successful but the file is not working properly, it may be due to executable file corruption. Run a registry scan to identify and fix any issues.
3. If the file is not downloading at all, check your internet connection and try again. Make sure to disable any antivirus or firewall software temporarily, as they may be blocking the download.
4. If you are using Windows 10, ensure that you are downloading the correct version of dxcpl.exe for your operating system. Different versions may be available for different Windows versions.
5. If you are encountering a DirectX error, try forcing the use of the “warp” option in the dxcpl.exe file. This can sometimes resolve DirectX-related issues.
High CPU usage caused by dxcpl.exe file download and fix
If you’re experiencing high CPU usage caused by the dxcpl.exe file, there is a solution to fix it. Follow these steps to resolve the issue:
1. First, download the dxcpl.exe file from a trusted source. [Provide download link]
2. Once downloaded, locate the file on your computer.
3. Right-click on the dxcpl.exe file and select “Run as administrator.”
4. A window will appear with various options. Look for the “Force WARP” option and enable it by selecting the checkbox.
5. Click on “Apply” to save the changes.
6. Restart your computer for the changes to take effect.
Can’t delete dxcpl.exe file download and fix
If you’re unable to delete the dxcpl.exe file download and need to fix it, follow these steps:
1. Close any programs that may be using the file.
2. Open the Task Manager by pressing Ctrl + Shift + Esc.
3. In the Task Manager, go to the “Processes” tab and look for any processes related to dxcpl.exe. Right-click on them and select “End Task”.
4. Now, navigate to the location of the dxcpl.exe file. This can vary depending on your operating system, but it is typically found in the “System32” folder.
5. Right-click on the dxcpl.exe file and select “Delete”.
6. If you receive an error message saying that the file is in use, restart your computer and try again.
7. After deleting the file, empty your recycle bin to ensure it is completely removed from your system.
Background running of dxcpl.exe file download and fix
The dxcpl.exe file is a utility provided by Microsoft for troubleshooting DirectX issues on various Windows operating systems, including Windows 10. It is an executable file that can be downloaded and used to fix DirectX errors and problems.
To download and fix the dxcpl.exe file, follow these steps:
1. Go to the Microsoft website and search for “dxcpl.exe download”.
2. Locate the official Microsoft download page for the dxcpl.exe file.
3. Click on the download link to start the download.
4. Once the download is complete, locate the downloaded file on your computer.
5. Double-click on the file to run it and start the installation process.
6. Follow the on-screen instructions to complete the installation.
7. After the installation is complete, you can use the dxcpl.exe file to fix DirectX issues on your Windows operating system.
System file aspects of dxcpl.exe file download and fix
The dxcpl.exe file is a system file related to DirectX, a crucial component for running multimedia applications on Windows operating systems. If you’re experiencing DirectX errors or issues, downloading and fixing the dxcpl.exe file can help resolve them.
To download the dxcpl.exe file, follow these steps:
1. Go to the Microsoft website and search for “dxcpl.exe download.”
2. Click on the official Microsoft link to download the file.
3. Save the file to a convenient location on your computer.
Once downloaded, you can fix any DirectX problems by using the dxcpl.exe file:
1. Double-click on the downloaded dxcpl.exe file to open it.
2. Follow the on-screen instructions to complete the installation process.
3. After installation, restart your computer.
By fixing any DirectX issues with the dxcpl.exe file, you can ensure smooth performance and compatibility with multimedia applications on your Windows OS.
Latest Update: July 2025
We strongly recommend using this tool to resolve issues with your exe and dll files. This software not only identifies and fixes common exe and dll file errors but also protects your system from potential file corruption, malware attacks, and hardware failures. It optimizes your device for peak performance and prevents future issues:
- Download and Install the Exe and Dll File Repair Tool (Compatible with Windows 11/10, 8, 7, XP, Vista).
- Click Start Scan to identify the issues with exe and dll files.
- Click Repair All to fix all identified issues.

Associated software with dxcpl.exe file download and fix
- Check if the dxcpl.exe file is missing or corrupted:
- Open File Explorer by pressing Windows key + E.
- Navigate to the folder where the dxcpl.exe file is supposed to be located.
- Check if the dxcpl.exe file is present.
- If the file is missing or corrupted, proceed to the next step.
- Download the dxcpl.exe file:
- Open a web browser on your computer.
- Go to a trusted website that offers the dxcpl.exe file for download.

- Search for “dxcpl.exe download” in the website’s search bar.
- Click on the appropriate download link for your operating system.
- Wait for the download to complete.
- Install or replace the dxcpl.exe file:
- Locate the downloaded dxcpl.exe file in your computer’s Downloads folder.
- Double-click on the file to open the installation wizard.
- Follow the on-screen instructions to install the dxcpl.exe file.
- If prompted, choose the desired installation location.

- Wait for the installation process to complete.
- Verify the associated software’s compatibility:
- Open the associated software that uses the dxcpl.exe file.
- Check the software’s documentation or official website for compatibility information.

- Ensure that the software is compatible with your version of Windows.
- If the software is not compatible, consider upgrading or finding an alternative software.
- Update the associated software:
- Open the associated software.
- Go to the software’s Settings or Options menu.
- Look for an option related to software updates.
- If an update is available, click on the Update or Check for Updates button.
- Follow the prompts to download and install the update.
Creator of dxcpl.exe file download and fix
If you’re facing Directx errors on your Windows OS, the dxcpl.exe file can be a helpful solution. This article provides a direct download link for the dxcpl.exe file and instructions on how to fix various Windows OS problems using it.
To get started, download the dxcpl.exe file and save it to a convenient location on your computer. Then, run the file as an administrator to open the DirectX Control Panel.
From there, you can adjust the settings to fix different types of Directx issues, such as graphical glitches or compatibility problems. The dxcpl.exe file is a Microsoft DirectX utility that allows you to modify Directx settings for specific cases or applications.
By following this step-by-step guide, you can resolve various Directx errors and improve your overall system performance. Whether you’re encountering issues in a game like PES 2017 or PES 2016, or facing DirectX 12-related problems, the dxcpl.exe file provides a comprehensive solution.
Note that this fix is applicable to all Windows OS versions, including Windows 10, Windows 8, and Windows 7. Don’t let Directx errors limit your gaming experience – tackle them head-on with the dxcpl.exe file.
Safe way to end task for dxcpl.exe file download and fix
To safely end the task for dxcpl.exe file download and fix, follow these steps:
1. Press Ctrl + Shift + Esc to open the Task Manager.
2. Click on the Processes tab.
3. Find and select dxcpl.exe from the list of processes.
4. Click on the End Task button.
5. Confirm the action by clicking End Process in the pop-up window.
Ending the task for dxcpl.exe can help resolve various Windows OS problems related to DirectX. This executable file is commonly associated with DirectX issues. By following these steps, you can effectively troubleshoot any errors or conflicts caused by dxcpl.exe.
Description of the dxcpl.exe file download and fix process
The dxcpl.exe file download and fix process is a straightforward solution to resolve various Windows OS problems related to DirectX. To begin, you need to find a reliable source to download the dxcpl.exe file. Once downloaded, locate the file on your computer and run it. This will open the DirectX Control Panel.
Click on “Edit List…” to add the application you want to fix. Browse and select the executable file of the problematic program.
Next, choose the desired DirectX version from the “Force Software DirectX Version” dropdown menu.
After configuring the settings, click on “Apply” and then “OK”.
This process will force the chosen DirectX version for the selected program, resolving any DirectX-related issues.
Remember to restart your computer for the changes to take effect.
Not responding issues with dxcpl.exe file download and fix
If you’re experiencing issues with the dxcpl.exe file download and need a fix, you’re in the right place. Here’s a step-by-step guide to help you resolve any problems you may encounter.
1. Start by locating the dxcpl.exe file on your system. The path may vary depending on your operating system, so be sure to check the appropriate directories.
2. Once you’ve found the file, ensure that you have the correct version for your Windows OS. Installing an incompatible version can cause errors and compatibility issues.
3. If you’re encountering a DirectX error, using dxcpl.exe can be a helpful solution. This utility allows you to modify DirectX settings and resolve issues related to graphics and gaming.
4. To fix the problem, right-click on the dxcpl.exe file and select “Run as administrator.” This will give the program the necessary permissions to make changes to your system.
5. Once the program is open, you’ll see a table with various options. Look for the settings that are relevant to your case and make the necessary changes.
Removal tool for dxcpl.exe file download and fix
If you’re experiencing issues with the dxcpl.exe file on your Windows OS, we have a solution for you. To download and fix the dxcpl.exe file, follow these simple steps:
1. First, make sure you have administrative privileges on your computer.
2. Go to the official Microsoft website and search for “dxcpl.exe download.”
3. Find a reliable source and download the file.
4. Once downloaded, locate the dxcpl.exe file on your computer.
5. Right-click on the file and select “Run as administrator.”
6. Follow the on-screen instructions to complete the installation.
7. Restart your computer to apply the changes.
Startup settings for dxcpl.exe file download and fix
To download and fix the dxcpl.exe file for all Windows OS problems, follow these steps:
1. Download the dxcpl.exe file from a trusted source or the official Microsoft website.
2. Once the download is complete, locate the file on your computer.
3. Right-click on the dxcpl.exe file and select “Run as administrator” to ensure proper installation.
4. Follow the on-screen instructions to complete the installation process.
5. After installation, open the dxcpl.exe file.
6. In the “Edit List” tab, click on the “Add” button and browse for the program or game that is experiencing DirectX issues.
7. Select the program or game from the list and click on “Open” to add it.
8. In the “Scope” section, choose the desired DirectX version (e.g., DirectX 12) for the selected program or game.
9. Click on “Apply” to save the changes.
10. Restart your computer for the changes to take effect.
Performance impact of dxcpl.exe file download and fix
The dxcpl.exe file is a useful utility for fixing various performance issues related to DirectX on all Windows operating systems. It is especially helpful for resolving DirectX 12 issues in games like PES 2017. By downloading and using this file, you can solve problems related to graphics, sound, and other DirectX-related issues in a simple and efficient manner.
To start, download the dxcpl.exe file from a reliable source and save it to a location of your choice on your computer. Once downloaded, double-click the file to run it. This will open the DirectX Control Panel, where you can tweak various settings to optimize your DirectX performance.
In the control panel, you can adjust the scope of DirectX to enhance performance in specific games or applications. You can also enable or disable certain features, change the file version, and even set paths for specific files. These settings can greatly improve the performance of DirectX in your games and other applications.
Updating dxcpl.exe file download and fix
Updating the dxcpl.exe file is essential for fixing various Windows OS problems related to DirectX. To download and fix the file, follow these steps:
1. Go to the official Microsoft website and search for “dxcpl.exe download.”
2. Select the appropriate version for your Windows OS and click on the download link.
3. Once the download is complete, locate the downloaded file on your computer.
4. Right-click on the dxcpl.exe file and select “Run as administrator” to open it.
5. In the DirectX Control Panel, navigate to the “DirectX” tab and select the desired settings and configurations.
6. Click on “Apply” to save the changes and resolve any DirectX issues.
7. Restart your computer to ensure the changes take effect.
By updating and fixing the dxcpl.exe file, you can effectively resolve various Windows OS problems related to DirectX, ensuring optimal performance for applications like OBS Studio and PES 2017.
Downloading dxcpl.exe file download and fix
Fixing the dxcpl.exe file download is crucial for resolving various Windows OS problems. This executable file, related to Microsoft DirectX, is known to tackle DirectX issues. To download and fix dxcpl.exe, follow these steps:
1. Visit the official Microsoft website.
2. Search for “dxcpl.exe” in the search bar.
3. Click on the appropriate download link for your operating system (OS).
4. Once the download is complete, locate the downloaded file.
5. Right-click on the file and select “Run as administrator.”
6. Follow the on-screen instructions to complete the installation process.
7. After installation, launch dxcpl.exe.
8. Use the features and utilities provided to fix DirectX issues specific to your OS.
9. Refer to online resources or Microsoft’s support documentation for further assistance.
10. By resolving DirectX issues with dxcpl.exe, you can enhance the performance of various applications, including PES 2017.
Compatibility with different Windows versions for dxcpl.exe file download and fix
dxcpl.exe File Download and Fix – All Windows OS Problems Solved
| Windows Version | Compatibility |
|---|---|
| Windows 10 | Compatible |
| Windows 8.1 | Compatible |
| Windows 8 | Compatible |
| Windows 7 | Compatible |
| Windows Vista | Compatible |
| Windows XP | Compatible |
Alternatives to dxcpl.exe file download and fix
- Press Windows Key + R to open the Run dialog box.
- Type “dxdiag” in the box and press Enter to open the DirectX Diagnostic Tool.
- In the DirectX Diagnostic Tool window, click on the “System” tab.
- Check the DirectX Version under the System Information section.
- If you have an older version of DirectX, visit the official Microsoft website and download the latest version.
- Run the downloaded file and follow the on-screen instructions to update DirectX.

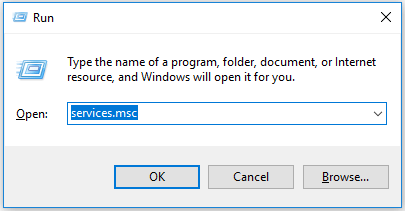
Repair Method 2: Reinstall or Repair DirectX
- Press Windows Key + R to open the Run dialog box.
- Type “appwiz.cpl” in the box and press Enter to open the Programs and Features window.
- In the Programs and Features window, locate and select “Microsoft DirectX“.
- Click on the “Uninstall/Change” button.
- Follow the on-screen instructions to either repair or reinstall DirectX.
- Once the process is complete, restart your computer.
Repair Method 3: Run SFC Scan
- Press Windows Key + X and select “Command Prompt (Admin)” or “Powershell (Admin)” from the menu.
- In the Command Prompt or Powershell window, type “sfc /scannow” and press Enter.
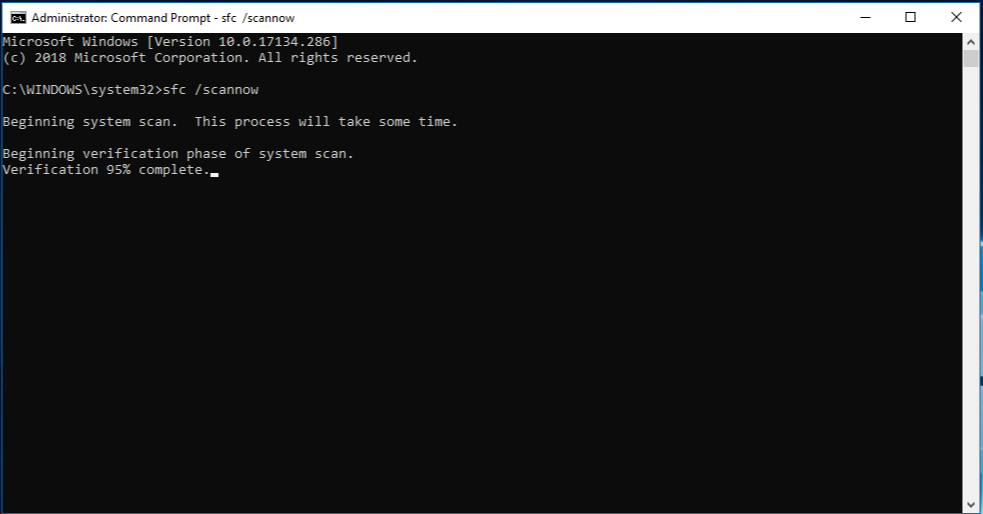
- Wait for the System File Checker to scan and repair any corrupted system files.
- Once the scan is complete, restart your computer.
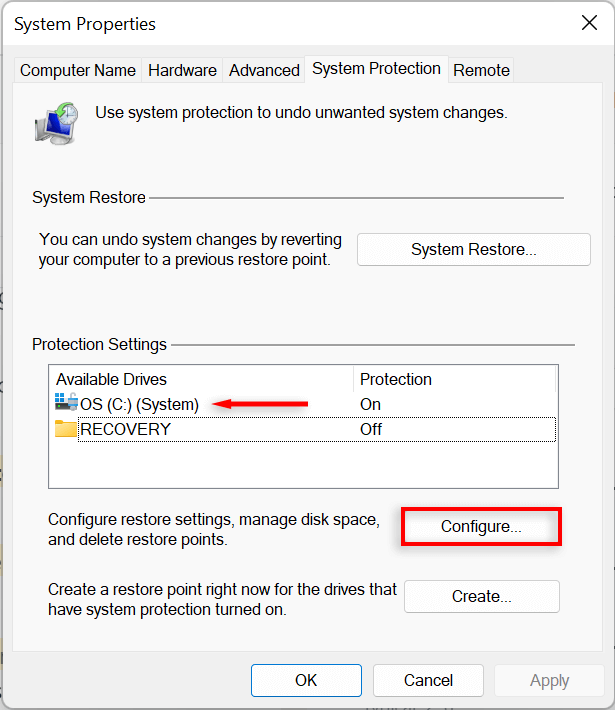
Repair Method 4: Perform a System Restore
- Press Windows Key + R to open the Run dialog box.
- Type “rstrui” in the box and press Enter to open the System Restore window.
- In the System Restore window, click on “Next“.
- Select a restore point from the list that was created before the issue occurred.
- Click on “Next” and then “Finish” to start the restoration process.
- Wait for the system to restore the selected restore point and restart your computer.