CP210xVCPInstaller_x64.exe Error and Driver Setup
Welcome to our informative article on CP210xVCPInstaller_x64.exe Error and Driver Setup. In this piece, we will delve into the intricacies of this common error and provide you with valuable insights on how to successfully set up the driver. So, fasten your seatbelts and get ready to unravel the mysteries behind CP210xVCPInstaller_x64.exe!
- Download and install the Exe and Dll File Repair Tool.
- The software will scan your system to identify issues with exe and dll files.
- The tool will then fix the identified issues, ensuring your system runs smoothly.
What is cp210xvcpinstaller_x64.exe: Understanding the Purpose and Function of the File
The cp210xvcpinstaller_x64.exe file is a software utility provided by Silicon Labs for installing the CP210x USB to UART Bridge VCP drivers on your computer. This file is essential for proper device operation and communication between your host and the CP210x USB device.
To install the driver using cp210xvcpinstaller_x64.exe, follow these steps:
1. Download the cp210xvcpinstaller_x64.exe file from the Silicon Labs website or another trusted source.
2. Locate the downloaded file on your computer.
3. Double-click the file to run the installer.
4. Follow the on-screen prompts to complete the installation process.
5. Once the installation is complete, you can verify that the driver was installed successfully by checking the Device Manager in the Control Panel.
If you encounter any errors or have questions during the installation process, refer to the documentation or support resources provided by Silicon Labs for further assistance.
Latest Update: July 2025
We strongly recommend using this tool to resolve issues with your exe and dll files. This software not only identifies and fixes common exe and dll file errors but also protects your system from potential file corruption, malware attacks, and hardware failures. It optimizes your device for peak performance and prevents future issues:
- Download and Install the Exe and Dll File Repair Tool (Compatible with Windows 11/10, 8, 7, XP, Vista).
- Click Start Scan to identify the issues with exe and dll files.
- Click Repair All to fix all identified issues.

Safety of cp210xvcpinstaller_x64.exe: Is it a Trusted File or Potential Threat?
The safety of CP210xVCPInstaller_x64.exe depends on its source and whether it is a trusted file or a potential threat. It is important to download the file from a reliable source, such as the official website of Silicon Labs or a trusted software download platform. Before downloading, it is recommended to check the file’s signatures to ensure its authenticity. Once downloaded, you can proceed with the driver setup by running the CP210xVCPInstaller_x64.exe file. Follow the instructions provided by the installer, which may include steps such as accessing the Device Manager and locating the CP210x device. If you encounter any trouble during the installation process, you can refer to the support resources available on the Silicon Labs website or reach out to the community for assistance. Remember to always exercise caution when downloading and installing files from the internet to protect your computer’s security.
Common Errors Associated with cp210xvcpinstaller_x64.exe and How to Resolve Them
- Error 1: “The program can’t start because cp210xVCP.dll is missing from your computer.”
- Repair Steps:

- Open File Explorer by pressing Win + E on your keyboard.
- Navigate to the folder where the cp210xvcpinstaller_x64.exe file is located.
- Locate the missing cp210xVCP.dll file.
- Copy the cp210xVCP.dll file from a trusted source or from another computer.
- Paste the cp210xVCP.dll file into the same folder as the cp210xvcpinstaller_x64.exe file.
- Restart your computer.
- Error 2: “Cannot install the driver. The specified module could not be found.”
- Repair Steps:
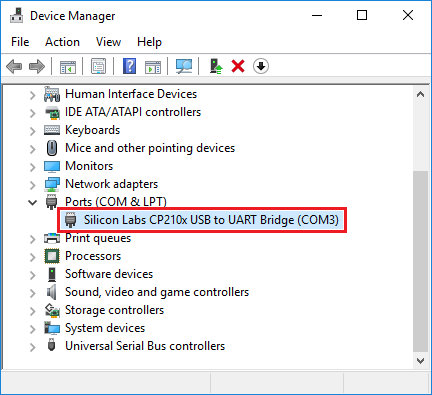
- Open Device Manager by pressing Win + X and selecting “Device Manager” from the menu.
- Expand the “Ports (COM & LPT)” category.
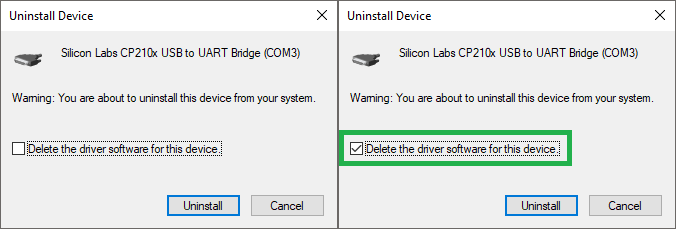
- Right-click on the “CP210x USB to UART Bridge Controller” and select “Uninstall device”.
- Check the box that says “Delete the driver software for this device” and click “Uninstall”.
- Download the latest version of the cp210xvcpinstaller_x64.exe file from the official website.
- Run the cp210xvcpinstaller_x64.exe file and follow the on-screen instructions to install the driver.
- Restart your computer.
- Error 3: “The driver installation failed.”
- Repair Steps:
- Disable your antivirus software temporarily.
- Open the cp210xvcpinstaller_x64.exe file as an administrator by right-clicking on it and selecting “Run as administrator”.
- Follow the on-screen instructions to install the driver.
- Enable your antivirus software again.
- Restart your computer.
python

import subprocess
def install_cp210x_driver():
# Specify the path to the cp210xvcpinstaller_x64.exe file
installer_path = "path/to/cp210xvcpinstaller_x64.exe"
try:
# Run the installer file using subprocess
subprocess.run([installer_path], check=True)
print("CP210x VCP driver installation completed successfully!")
except subprocess.CalledProcessError as e:
print(f"An error occurred during CP210x VCP driver installation: {e}")
# Call the function to install the CP210x VCP driver
install_cp210x_driver()
Please ensure you have the appropriate `cp210xvcpinstaller_x64.exe` file in the specified path before executing this code. Remember to verify the source and validity of the driver file to ensure the security and reliability of your system.
Repairing or Removing cp210xvcpinstaller_x64.exe: Step-by-Step Guide
CP210xVCPInstaller_x64.exe Error and Driver Setup
This article provides a step-by-step guide for repairing or removing the CP210xVCPInstaller_x64.exe error and setting up the driver correctly.
Repairing or Removing CP210xVCPInstaller_x64.exe
If you are facing issues with the CP210xVCPInstaller_x64.exe file, follow the steps below to repair or remove it:
| Step | Description |
|---|---|
| 1 | Close any programs using the CP210xVCPInstaller_x64.exe file. |
| 2 | Open the Control Panel on your computer. |
| 3 | Click on “Uninstall a program” or “Programs and Features” (depending on your operating system). |
| 4 | Locate CP210xVCPInstaller_x64.exe in the list of installed programs. |
| 5 | Right-click on CP210xVCPInstaller_x64.exe and select “Repair” or “Uninstall”. |
| 6 | Follow the on-screen instructions to complete the repair or uninstallation process. |
| 7 | Once the process is completed, restart your computer. |
Driver Setup
To set up the CP210xVCP driver correctly, follow the steps below:
| Step | Description |
|---|---|
| 1 | Visit the official website of the CP210xVCP driver. |
| 2 | Download the appropriate driver for your operating system. |
| 3 | Run the downloaded driver setup file. |
| 4 | Follow the on-screen instructions to install the driver. |
| 5 | Restart your computer to apply the changes. |