
Troubleshooting Convert EXE to MSI Microsoft Tool
Unlocking the potential of the Convert EXE to MSI Microsoft Tool can be a game-changer for software deployment. However, navigating through the troubleshooting process can be a daunting task. In this article, we delve into the common issues encountered and provide valuable insights to ensure a smooth conversion from EXE to MSI. So, let’s unravel the mysteries and equip ourselves with the troubleshooting know-how!
- Download and install the Exe and Dll File Repair Tool.
- The software will scan your system to identify issues with exe and dll files.
- The tool will then fix the identified issues, ensuring your system runs smoothly.
How to Extract MSI package from the Temp folder
To extract an MSI package from the Temp folder, follow these steps:
1. Open the Temp folder on your Windows computer. You can do this by pressing the Windows key + R, typing “%temp%” (without quotes), and hitting Enter.
2. Look for the MSI package you want to extract. It may have a random name or start with “MSI” followed by numbers and letters.
3. Once you’ve located the MSI package, right-click on it and select “Copy” from the context menu.
4. Navigate to the target folder where you want to save the extracted MSI package.
5. Right-click in the target folder and select “Paste” to extract the MSI package from the Temp folder.
6. You can now use the extracted MSI package for troubleshooting or other purposes.
Remember, extracting MSI packages from the Temp folder is just one way to troubleshoot issues with converting EXE to MSI using the Microsoft Tool. Other options, such as using MSI Wrapper or Advanced Installer, may provide a more comprehensive solution.
Latest Update: July 2025
We strongly recommend using this tool to resolve issues with your exe and dll files. This software not only identifies and fixes common exe and dll file errors but also protects your system from potential file corruption, malware attacks, and hardware failures. It optimizes your device for peak performance and prevents future issues:
- Download and Install the Exe and Dll File Repair Tool (Compatible with Windows 11/10, 8, 7, XP, Vista).
- Click Start Scan to identify the issues with exe and dll files.
- Click Repair All to fix all identified issues.

Is the EXE file safe to use?
When troubleshooting the Convert EXE to MSI Microsoft Tool, you may be wondering if the EXE file is safe to use. The safety of an EXE file depends on its source and content. To ensure safety, follow these steps:
1. Scan the EXE file for viruses using reliable antivirus software.
2. Check the reputation of the source from where you downloaded the file.
3. Use trusted conversion tools like MSI Wrapper or Advanced Installer.
4. Verify the digital signature of the EXE file to confirm its authenticity.
5. Consult online forums and communities for feedback from other users.
Remember, it’s crucial to exercise caution when downloading and running EXE files, especially if they are from unknown sources. Taking these precautions will help you avoid any potential security risks when using the Convert EXE to MSI Microsoft Tool.
Common errors associated with the EXE file and how to fix them
-
Error 1: “EXE file not found” or “EXE file is corrupted”
- Check if the EXE file exists in the specified location.
- If the file is missing, try reinstalling the application to restore the EXE file.
- If the file is corrupted, download a new copy of the EXE file from a reliable source.
- Open the downloaded EXE file and follow the installation instructions.
-
Error 2: “EXE file cannot be opened” or “Invalid EXE file format”
- Make sure you have the necessary permissions to access and execute the EXE file.
- Right-click on the EXE file and select “Properties.”
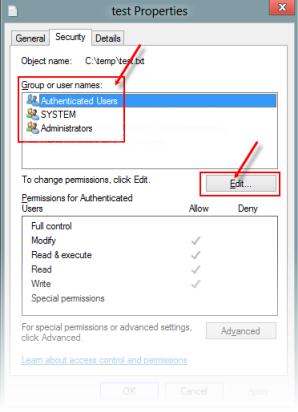
- Go to the “Security” tab and ensure that your user account has the appropriate permissions.
- If necessary, run the EXE file as an administrator by right-clicking on it and selecting “Run as administrator.”
- If the error persists, try running the EXE file in compatibility mode.
- Right-click on the EXE file, select “Properties,” go to the “Compatibility” tab, and check the box for “Run this program in compatibility mode for:”
- Choose the appropriate operating system from the dropdown menu.
- Click “Apply” and then “OK” to save the changes.
-
Error 3: “EXE file causing system crashes” or “EXE file consuming high CPU usage”
- Scan your computer for malware or viruses using a reliable antivirus program.
- Update your antivirus software and perform a full system scan.
- If any threats are detected, quarantine or remove them accordingly.
- Ensure that your operating system and drivers are up to date.
- Open Windows Update, check for updates, and install any available updates.
- If the issue persists, try disabling any unnecessary startup programs that may be conflicting with the EXE file.

- Open Task Manager by pressing Ctrl+Shift+Esc.
- Navigate to the “Startup” tab and disable any unwanted programs.
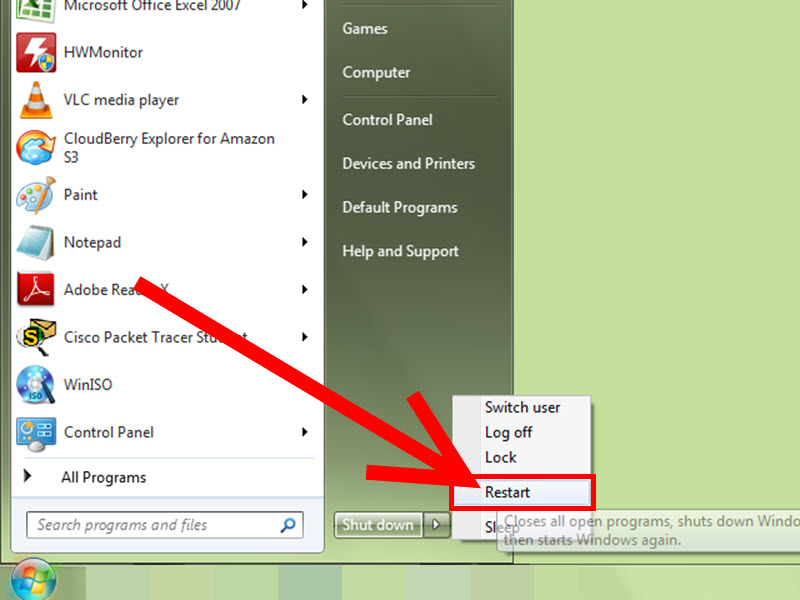
- Restart your computer for the changes to take effect.
How to repair or remove the EXE file if needed
To repair or remove an EXE file, follow these steps:
1. Repairing an EXE file:
– Open the command prompt and navigate to the location of the EXE file.
– Type “filename.exe /repair” and press Enter.
– Wait for the repair process to complete.
– Close the command prompt window.
2. Removing an EXE file:
– Open the command prompt and navigate to the location of the EXE file.
– Type “filename.exe /uninstall” and press Enter.
– Follow the on-screen prompts to uninstall the application.
– Close the command prompt window.
Remember to replace “filename.exe” with the actual name of the EXE file you want to repair or remove.
These steps can be helpful for system administrators, software developers, or anyone troubleshooting EXE files.
