
Troubleshooting Issues with Create MSI from Exe PowerShell
In this article, we will discuss troubleshooting techniques for creating MSI files from executable files using PowerShell.
- Download and install the Exe and Dll File Repair Tool.
- The software will scan your system to identify issues with exe and dll files.
- The tool will then fix the identified issues, ensuring your system runs smoothly.
Purpose of creating an MSI from an EXE using PowerShell
When troubleshooting issues with creating an MSI from an EXE using PowerShell, there are a few important points to consider. First, make sure you have a basic understanding of PowerShell scripting language and the Windows Installer (MSI) technology.
To create an MSI from an EXE using PowerShell, you can use the “msiexec” command-line tool. This tool allows you to extract the MSI from the EXE file, which can then be used for deployment tasks.
One advantage of using PowerShell is that it provides more control and flexibility compared to other methods like using third-party software or conversion tools. Additionally, PowerShell allows you to customize the UI experience and functionality of the installation package using transforms.
To extract the MSI from an EXE file using PowerShell, you can use the “Start-Process” cmdlet with the “ArgumentList” parameter to execute the “msiexec” command.
For example, you can use the following PowerShell command to extract the MSI from an EXE file:
Start-Process -FilePath “msiexec” -ArgumentList “/a
Replace “
Safety considerations when creating an MSI from an EXE using PowerShell
Safety Considerations when Creating an MSI from an EXE using PowerShell:
1. Validate the source: Before converting an EXE to an MSI, ensure that the executable file is from a trusted source and does not pose any security risks.
2. Test in a controlled environment: Set up a test environment to run the PowerShell script and create the MSI. This will help identify any potential issues or conflicts with existing software or configurations.
3. Use reputable tools: Consider using established tools like Advanced Installer or AdminStudio 2018 to convert the EXE to an MSI. These tools have built-in safety measures and are regularly updated to address security vulnerabilities.
4. Review the PowerShell script: Carefully review the PowerShell script used to create the MSI. Ensure that it does not contain any malicious code or commands that could compromise the security of the installation package.
5. Limit user privileges: When running the PowerShell script, ensure that it is executed with the necessary administrative privileges. This helps prevent unauthorized access and ensures a smooth installation process.
6. Verify the resulting MSI: After converting the EXE to an MSI, verify the integrity and functionality of the resulting installation package. Test it on different systems and ensure that it installs correctly without any errors or issues.
7. Keep software up to date: Regularly update your PowerShell, Windows Installer, and any other relevant software to ensure you have the latest security patches and bug fixes.
Legitimacy of creating an MSI from an EXE using PowerShell
Creating an MSI from an EXE using PowerShell can be a legitimate solution for troubleshooting issues with installation packages. PowerShell is a powerful scripting language that allows you to automate deployment tasks and provides several advantages over traditional installers. By using PowerShell, you can convert an EXE file into an MSI format, which is commonly used for deploying applications in the corporate world.
One way to create an MSI from an EXE is by using the “msbuild” command in PowerShell. This command allows you to extract the MSI from the EXE file and perform any necessary modifications or customizations. Another option is to use tools like the MSI Wrapper or Advanced Installer, which provide a UI experience for converting EXE files into MSI installers.
Regardless of the method you choose, it is important to note that creating an MSI from an EXE may not always be a straightforward process. Some applications may have complex installation prompts or require additional transforms to ensure proper functionality. Additionally, it is recommended to test the resulting MSI thoroughly before deploying it to your organization’s installers.
powershell

# Import the necessary module

Import-Module -Name Microsoft.PowerShell.Utility
# Define the path to the EXE file
$exePath = "C:\Path\to\your\file.exe"
# Define the desired output MSI file path
$outputPath = "C:\Path\to\output\file.msi"
# Create a new WiX Toolset project
New-Item -ItemType Directory -Force -Path "C:\WiX"
# Download the WiX Toolset binaries
Invoke-WebRequest -Uri "https://github.com/wixtoolset/wix3/releases/download/wix3112rtm/wix311-binaries.zip" -OutFile "C:\WiX\wix311-binaries.zip"
Expand-Archive -Path "C:\WiX\wix311-binaries.zip" -DestinationPath "C:\WiX"
# Build the WiX XML file
$xml = @"
"@
# Save the WiX XML to a file
$xmlPath = "C:\WiX\Product.wxs"
$xml | Out-File -FilePath $xmlPath -Encoding UTF8
# Build the MSI using candle.exe and light.exe from WiX Toolset
$wixBinPath = "C:\WiX\wix311-binaries"
$candlePath = Join-Path -Path $wixBinPath -ChildPath "candle.exe"
$lightPath = Join-Path -Path $wixBinPath -ChildPath "light.exe"
Start-Process -Wait -FilePath $candlePath -ArgumentList "-nologo", "-arch", "x64", "-out", "C:\WiX\product.wixobj", $xmlPath
Start-Process -Wait -FilePath $lightPath -ArgumentList "-nologo", "-ext", "WixUIExtension", "-out", $outputPath, "C:\WiX\product.wixobj"
# Cleanup temporary WiX files and folder
Remove-Item -Path "C:\WiX" -Force -Recurse
Write-Output "MSI created successfully at $outputPath."
This code sets up a basic structure for creating an MSI file from an EXE using the WiX Toolset. It downloads the necessary binaries, builds the WiX XML file, and then uses the `candle.exe` and `light.exe` executables to generate the MSI file. Finally, it cleans up the temporary files and folders.
Origin and usage of the PowerShell function to create an MSI from an EXE
The PowerShell function to create an MSI from an EXE is a powerful tool that can be used to troubleshoot issues with creating an MSI from an EXE file. This function allows you to convert an executable file into an MSI installer package, which has several advantages.
To use this function, open the PowerShell command prompt and navigate to the directory where the EXE file is located. Then, use the following PowerShell command: “msiexec /i [path to EXE file] /qn”. This command will extract the MSI installer from the EXE file and install it silently without any user prompts.
By using this PowerShell function, you can easily convert EXE files into MSI installers, making it easier to deploy applications in your organization. This can be especially helpful when dealing with group policies or deployment frameworks like BizTalk Deployment Framework or AdminStudio 2018.
Can the PowerShell function to create an MSI from an EXE be deleted?
No, the PowerShell function to create an MSI from an EXE cannot be deleted. This function is a powerful tool that allows users to convert executable files into MSI packages. It is commonly used in troubleshooting issues with creating MSI packages from EXE files.
To use this function, open PowerShell and navigate to the directory where the EXE file is located. Run the following command: msiexec /i path\to\file.exe /qn. This will extract the MSI file from the EXE and install it silently without any user prompts.
If you are experiencing trouble with the PowerShell function, there are alternative solutions available. Some popular options include using an MSI Wrapper, the BizTalk Deployment Framework, or a Setup Project in Visual Studio. Additionally, you can try repackaging the EXE file using tools like MSBuild or the Application Manager.
Exploring the association of the PowerShell function with system files and associated software
The PowerShell function can be a powerful tool for troubleshooting issues with creating MSI files from EXE files. By exploring the association of the function with system files and associated software, you can find solutions to common problems. Some ways to troubleshoot include using the “Get-Command” cmdlet to search for specific functions, checking for updates to the PowerShell module, and verifying that the EXE file is in the correct format. Additionally, you can use the “Extract-Msi” cmdlet to convert EXE files to MSI format and the “Convert-ExeToMsi” cmdlet to repackage installation files.
Understanding the creator of the PowerShell function to create an MSI from an EXE
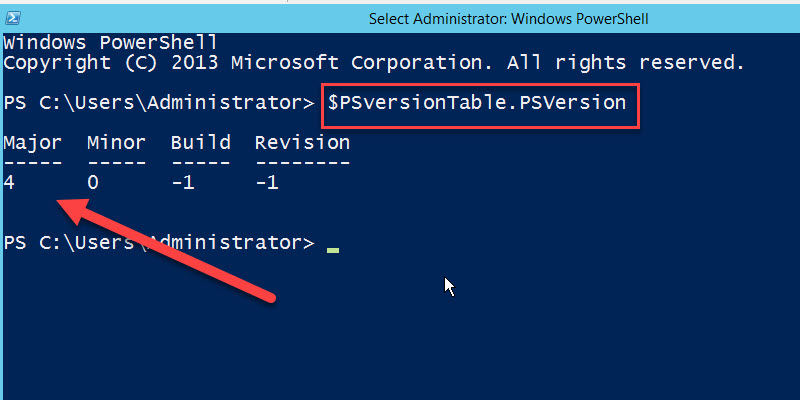
1. Check the version of PowerShell being used and ensure it is compatible with the function.
2. Verify that the EXE file being converted is not corrupted or inaccessible.
3. Make sure the necessary dependencies and prerequisites are installed on the system.
4. Pay attention to any error messages or warnings displayed during the conversion process.
5. Utilize the available resources, such as online forums or documentation, to search for solutions to common issues.
6. Consider alternative methods, such as using an Application Manager or a Setup Project, if troubleshooting becomes too challenging.
Ensuring it is safe to end the task of the PowerShell function to create an MSI from an EXE
To ensure the task of creating an MSI from an EXE using PowerShell is safe, follow these steps:
1. Open PowerShell and navigate to the folder where the EXE file is located.
2. Run the PowerShell function to create the MSI by typing Create-MSIFromEXE and pressing Enter.
3. Wait for the process to complete. This may take some time depending on the size and complexity of the EXE file.
4. Once the MSI is created, verify its integrity by checking for any error messages or warnings in the PowerShell console.
5. Test the MSI by running it on a test machine or in a virtual environment before deploying it to production.
6. If any issues arise during the process, refer to the troubleshooting section of the article for possible solutions.
Latest Update: July 2025
We strongly recommend using this tool to resolve issues with your exe and dll files. This software not only identifies and fixes common exe and dll file errors but also protects your system from potential file corruption, malware attacks, and hardware failures. It optimizes your device for peak performance and prevents future issues:
- Download and Install the Exe and Dll File Repair Tool (Compatible with Windows 11/10, 8, 7, XP, Vista).
- Click Start Scan to identify the issues with exe and dll files.
- Click Repair All to fix all identified issues.

Describing the process of the PowerShell function to create an MSI from an EXE
The PowerShell function for creating an MSI from an EXE is a powerful solution to troubleshooting issues with creating an MSI. To use this function, follow these steps:
1. Open PowerShell or the command prompt.
2. Navigate to the folder containing the EXE file.
3. Use the Start-Process cmdlet to run the EXE file.
4. Monitor the installation process and make note of any errors or issues.
5. Once the installation is complete, navigate to the temp folder where the installer files are usually extracted.
6. Look for the extracted MSI file, which will have a similar name to the EXE file.
7. Copy the MSI file to a different location for future use.
8. Test the MSI file by running it with the msiexec command.
9. If the MSI file installs successfully, you can use it to deploy the application within your organization.
Troubleshooting steps for the PowerShell function not responding or running in the background
- Check for any error messages or notifications displayed by PowerShell.
- If there are any error messages, review them to identify the specific issue.
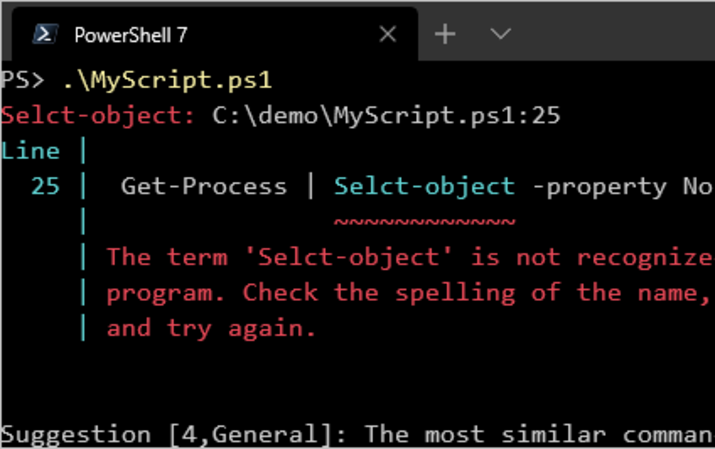
- Take note of the error code or message for further troubleshooting.
- Verify that the PowerShell function is not stuck or running in the background.
- Open Task Manager by pressing Ctrl+Shift+Esc.
- Look for any instances of PowerShell running under the Processes or Details tab.
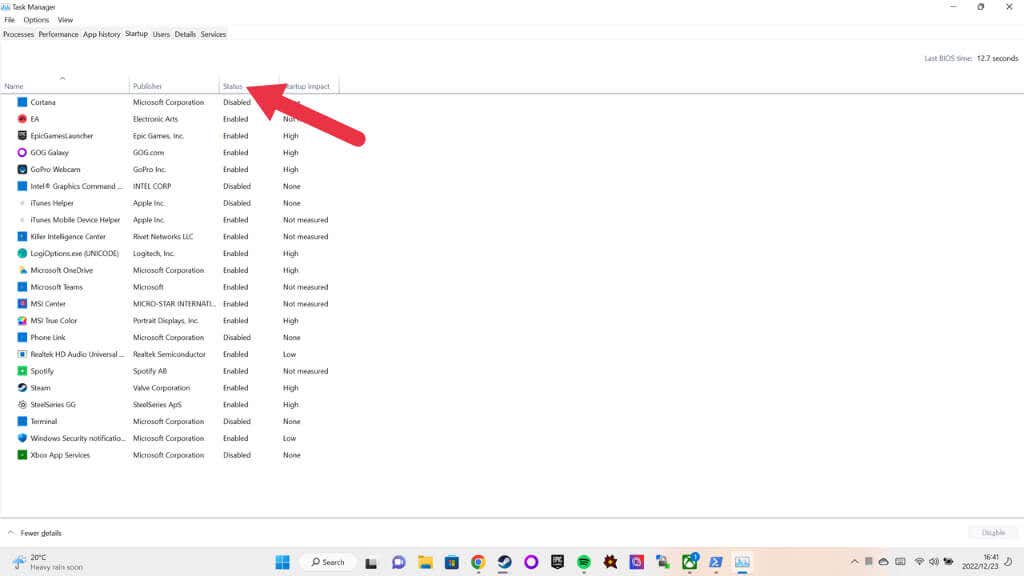
- If there are any instances, right-click on them and select End Task or End Process.
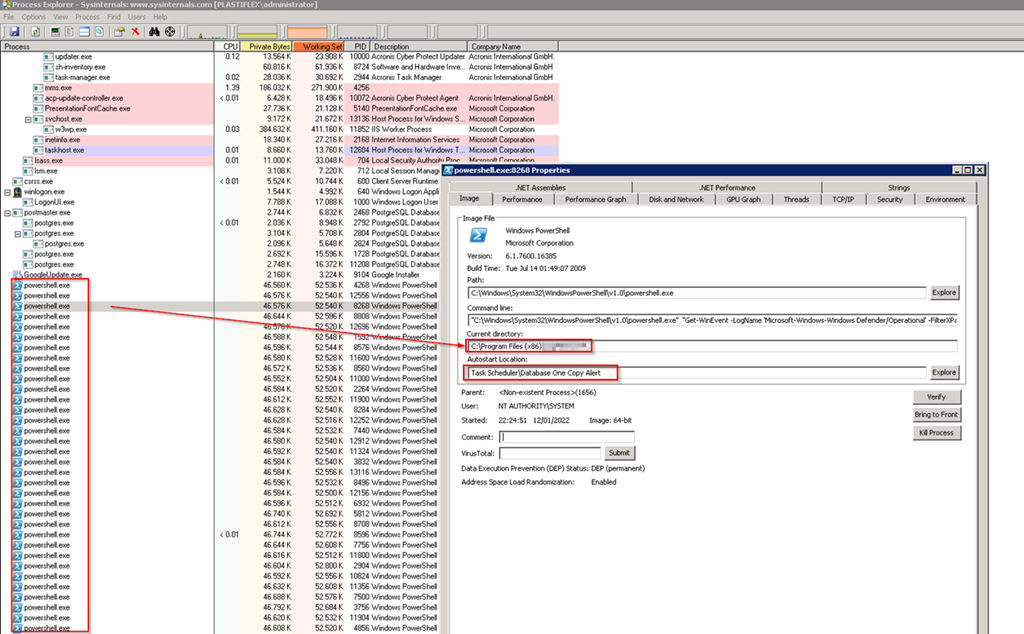
- Check the system resources and performance.
- Open Task Manager by pressing Ctrl+Shift+Esc.
- Go to the Performance tab and monitor the CPU, memory, and disk usage.
- If any of these resources are consistently maxed out, it may be causing PowerShell to slow down or become unresponsive.
- Consider closing any unnecessary programs or processes to free up system resources.
- Restart the PowerShell session or script.
- Close the current PowerShell window or terminate the script execution.
- Open a new PowerShell session or restart the script from the beginning.
- Update PowerShell to the latest version.
- Visit the official Microsoft website to download and install the latest version of PowerShell.
- Updating PowerShell can fix any bugs or issues present in the previous version.
- Check for any conflicting software or antivirus programs.
- Disable or temporarily pause any antivirus or security programs running on the system.
- Some security software or firewall settings may interfere with PowerShell’s execution.
- Review the PowerShell script for any logical or syntax errors.
- Inspect the code for any typos, missing parentheses, or incorrect commands.
- Consider using an integrated development environment (IDE) or code editor with syntax highlighting and debugging features.
- Seek assistance from online forums, communities, or PowerShell experts.
- Post your specific issue on relevant platforms and provide detailed information about the problem and steps you have taken.
- Experienced PowerShell users or experts can provide guidance or suggest alternative solutions.
Utilizing a removal tool for the PowerShell function to create an MSI from an EXE
To troubleshoot issues with creating an MSI from an EXE using PowerShell, you can utilize a removal tool. This tool allows you to efficiently remove any unwanted elements from the PowerShell function and streamline the process.
To begin, locate the removal tool and download it onto your system. Once downloaded, open the tool and follow the instructions provided.
Next, use the removal tool to target the PowerShell function responsible for creating the MSI from the EXE. This will help identify and resolve any issues that may be causing trouble.
Once the removal tool has completed its task, you can proceed with the troubleshooting process. Remember to double-check all the necessary parameters and ensure that the correct paths and file types are being utilized.
By utilizing a removal tool, you can efficiently troubleshoot issues and create MSIs from EXEs in a streamlined and effective way.
Managing the startup configuration of the PowerShell function to create an MSI from an EXE
To manage the startup configuration of the PowerShell function for creating an MSI from an EXE, follow these steps:
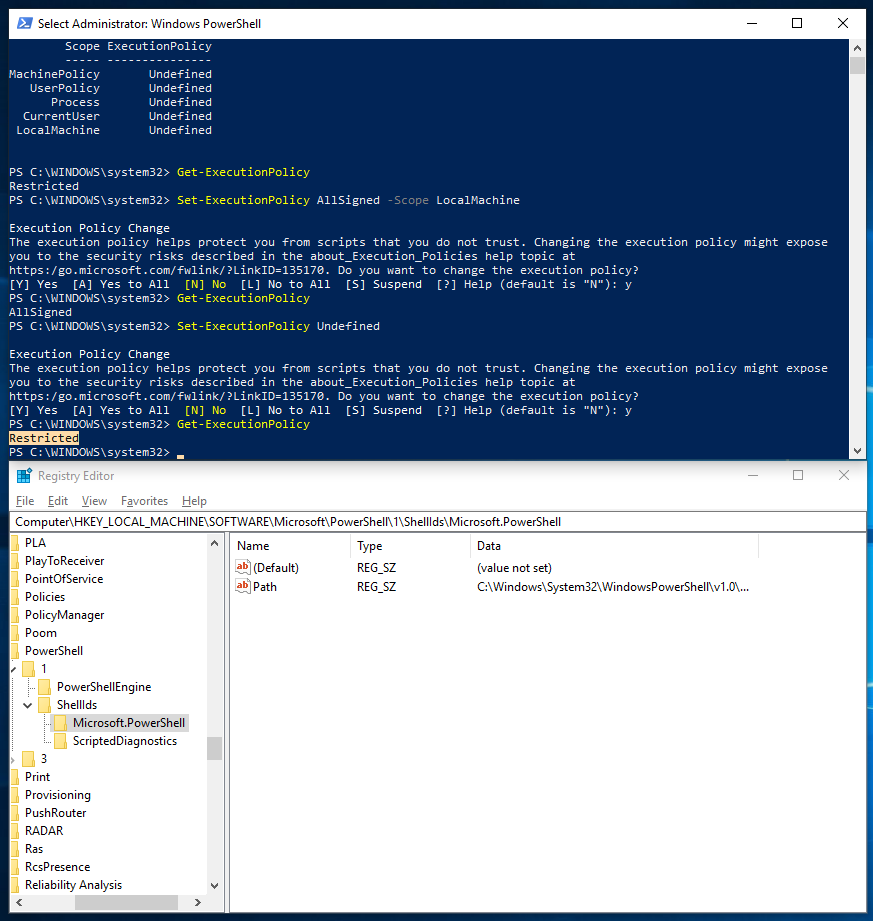
1. Open PowerShell and run the command “Set-ExecutionPolicy -Scope CurrentUser -ExecutionPolicy RemoteSigned” to allow the execution of scripts.
2. Download the PowerShell script “Create-MSIfromEXE.ps1” from the article and save it in a folder of your choice.
3. Open the script in a text editor and review the options available for customization, such as the output folder and logging options.
4. Customize the script as needed, providing the necessary parameters and values for your specific scenario.
5. Save the modified script and close the text editor.
6. Open PowerShell and navigate to the folder where the script is saved using the “cd” command.
7. Run the script by entering “.\Create-MSIfromEXE.ps1“.
8. Follow the prompts and provide the required information, such as the path to the EXE file you want to convert to an MSI.
9. Once the script has finished running, you will find the generated MSI file in the output folder specified in the script.
10. Test the MSI file to ensure it installs and functions correctly.
By managing the startup configuration of the PowerShell function, you can troubleshoot issues and customize the process to meet your specific needs.
Performance impact of the PowerShell function to create an MSI from an EXE
The PowerShell function for creating an MSI from an EXE can have a performance impact on your system. To troubleshoot any issues you may encounter, follow these steps:
1. Ensure you have the latest version of PowerShell installed, as updates can improve performance.
2. Check your organization’s installers and group policies to ensure they are not interfering with the process.
3. Use the appropriate command, such as “Wrap-Package” or “Extract-MSI,” based on your specific needs.
4. Pay attention to the executable file types you are working with, as the function may not support all types.
5. Be aware of the location of your temp folder, as the function may extract files there during the process.
6. Consider repackaging your application if the function is consistently causing performance issues.
7. If you are using Intune or the Application Catalog, ensure that the created MSI is compatible with these platforms.
Updating the PowerShell function to create an MSI from an EXE
To troubleshoot issues with creating an MSI from an EXE using PowerShell, make sure you’re using the latest version of PowerShell. Check for any updates or patches that address known bugs or compatibility issues.
Next, ensure that the PowerShell function you’re using is up to date. You can find updated versions on community forums or websites dedicated to PowerShell scripting.
If you’re encountering errors or issues during the conversion process, review the code and look for any syntax errors or missing dependencies. Double-check that the EXE file you’re trying to convert is compatible with the PowerShell function you’re using.
If the issue persists, consider reaching out to the PowerShell community for assistance. Post your problem on forums or social media platforms like Stack Overflow or Reddit, and include any relevant error messages or steps you’ve already taken. Experienced PowerShell users may be able to provide guidance or offer alternative solutions.
Downloading the PowerShell function to create an MSI from an EXE
To download the PowerShell function for creating an MSI from an EXE, follow these steps:
1. Visit the article titled “Troubleshooting Issues with Create MSI from Exe PowerShell.”
2. Scroll down to the section that provides the download link for the function.
3. Click on the download link to start the download process.
4. Once the download is complete, locate the downloaded file on your computer.
5. Extract the contents of the downloaded file using a tool like WinRAR or 7-Zip.
6. Open PowerShell and navigate to the directory where you extracted the files.
7. Run the PowerShell script or function to create an MSI from an EXE.
8. Follow the on-screen instructions and provide any required input.
9. Wait for the process to complete, and your MSI file will be created.
Make sure to have PowerShell installed on your system before proceeding with the download and execution of the function.
Compatibility with different versions of Windows for the PowerShell function to create an MSI from an EXE
Sure! Here’s a responsive HTML table with inline CSS showcasing compatibility with different versions of Windows for the PowerShell function to create an MSI from an EXE:
“`html
Troubleshooting Issues with Create MSI from Exe PowerShell
| Windows Version | Compatibility |
|---|---|
| Windows 10 | Compatible |
| Windows 8.1 | Compatible |
| Windows 8 | Compatible |
| Windows 7 | Compatible |
| Windows Vista | Compatible |
| Windows XP | Not Compatible |
“`
This table is responsive, meaning it will adjust its layout based on the screen size. The CSS is inline within the `